Veterinary dental care has many inherent challenges. Clients are often not aware of signs of oral pain in their pets so dental problems may go unnoticed for some time. Routine preventative measures can be a challenge for clients to carry out on a regular basis and in the absence of daily brushing, dental disease may be allowed to progress more rapidly (Gorrel and Rawlings, 1996). Once the animal is presented in clinic, there are additional challenges which can complicate accurate diagnosis. Animals are not able to describe pain or discomfort so initial identification of a dental problem may be delayed. The anatomy of companion animals can also pose a problem in that many animals have a relatively small oral cavity making it difficult to view gross dental abnormalities. In addition, the gingiva covers a majority of the tooth surface so occult oral pathology may go unnoticed without further diagnostic tests.
Dental radiography is a non-invasive imaging technique that efficiently reveals sub-gingival structures and allows better assessment of the integrity of the tooth roots and peridontium. The benefits of dental radiography to the patient are considerable in terms of minimizing unnecessary trauma and pain from the dental procedure as well maximizing recovery and ultimately helping to maintain the patient’s overall health. While specialized dental x-ray equipment is needed for the best images, this equipment is easy to use and, if routinely utilized, can enhance dental profits for the clinic.
Oral defenses
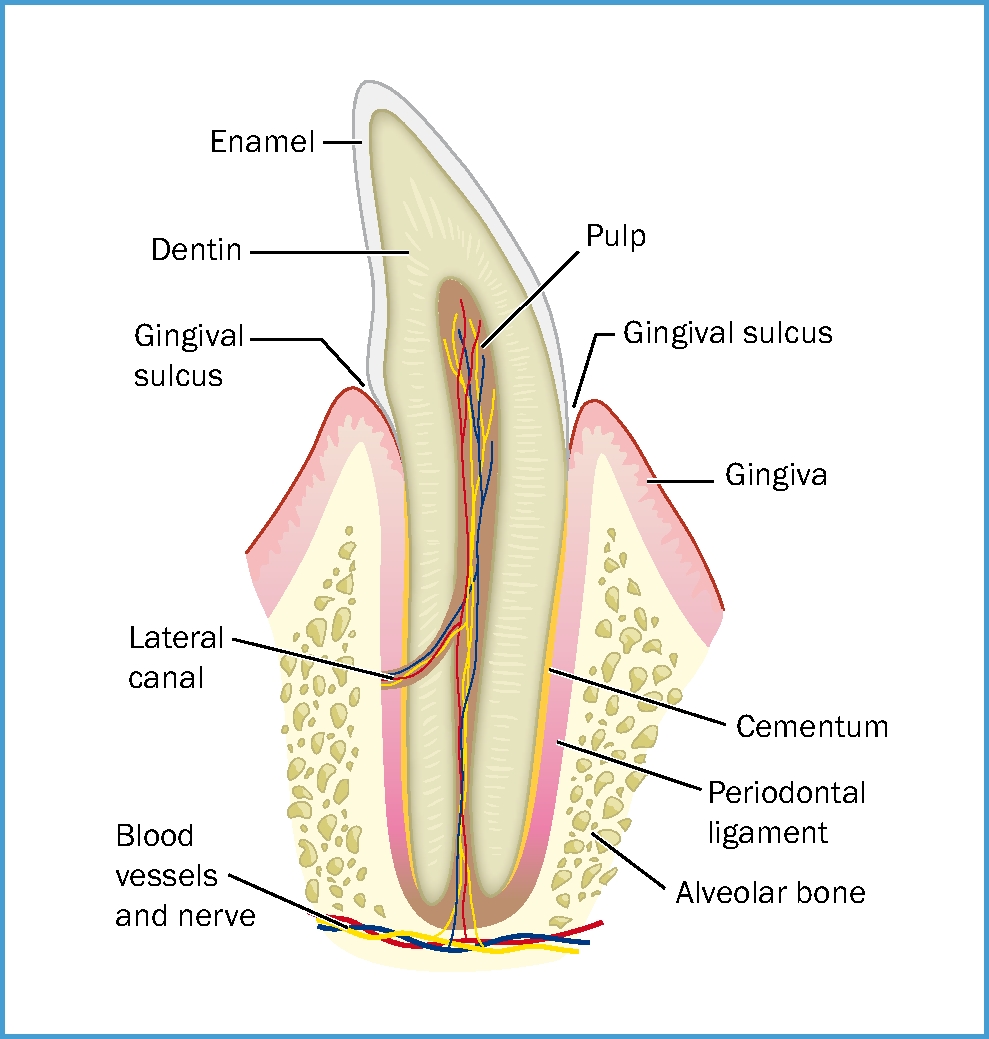
The tooth is a complicated structure comprising mineralized tissues which vary in structure and density. Both the composition of the tooth and the peridontium help to protect it from oral pathology and injury. The exposed surfaces of the tooth’s crown are protected by a hard enamel layer making it durable and relatively resistant to trauma or disease (Figure 1). In contrast, the root surface is covered by cementum, a porous tissue that is innervated by nerve tracts, blood vessels and the periodontal ligament which secures the tooth within the alveolus to the mandibular or maxillary bone. The root is protected from trauma and pathogens by a layer of gingival tissue that encloses the bone and extends to the cemento-enamel junction. If the enamel or gingival tissue is compromised in any way, a number of disease processes can result (Hoffman et al, 2007).
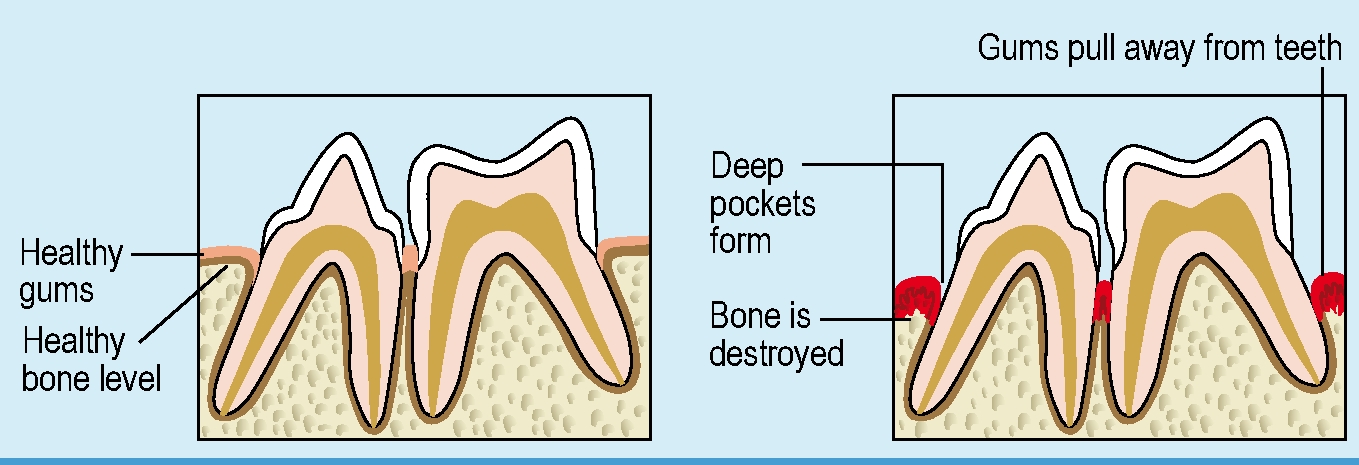
Over 50% of the tooth is surrounded by sub-gingival tissues and as such it is unseen by the naked eye (DuPont and DeBowes, 2009). The gingival epithelium provides a protective role against the development of periodontal disease by adhering to the tooth surface and forming a physical barrier against pathogenic invasion of sub-gingival tissues and helping to protect the peridontium against trauma that may occur from chewing. If oral pathology extends into the gingival-dental fibers, this can lead to epithelial detachment, and exposure of the tooth root can occur (Figure 2). Further, pathogens may prevent reattachment of the gingival epithelium to the tooth surface and thus promote continued breakdown of gingival tissue and subsequent alveolar bone recession. In addition, pathogens entering the pulp chamber of the tooth can lead to pulp necrosis, and periapical root abscess can lead to bone loss (Harvey, 1998). Gingival recession can be estimated during the visual oral examination but early bone loss is difficult to visualize with the naked eye, unless there is obvious furcation exposure, and thus it can be challenging to diagnose. With dental radiography, disease or injury can be detected in its early stages and can help ensure prompt and appropriate treatment in order to maintain patient health, and hopefully reduce the need for extractions (Caiafa, 2010).
Importance of dental radiography
Dental radiography is a minimally invasive diagnostic tool that is useful for gathering information at a sub-gingival level. Within the veterinary practice, routine oral radiography accompanied by annual dental prophylaxis can expand profits from dental services as well as enhance periodontal, endodontal and orthodontal care for animals.
One of the most beneficial reasons to use dental radiography is to help ensure early detection of oral pathology so that treatment can commence before the health of the animal is compromised. Injury and infection within the oral cavity can lead to pathogenesis of life-threatening disease so prompt treatment is critically important. Unlike all other tissues in the body, the teeth do not shed cells so bacterial levels rise to very high levels, and if the periodontium is compromised by trauma or pathology, pathogens can gain an entry point to systemic circulation (Hennet, 1995). Bacteraemia may lead to compromised circulation, and the systemic spread of oral toxins can result in damage to renal tubules and cardiac valves. In addition, inhibited immune response can affect the course of existing systemic disease and result in metastatic infection and delayed healing of wounds (Rawlinson et al, 2011; Pavlica et al, 2008). Early detection of dental pathology is key to prevention of advanced dental and systemic disease.
Enhancing knowledge of sub-gingival tissues is another key benefit to dental radiography. Oral radiographs can help ensure the veterinarian is aware of tooth root morphology so unnecessary trauma or force can be avoided when searching for roots that may be resorbed, or in an unexpected arrangement. In addition, the improved knowledge about the sub-gingival tissues can help save time during anaesthesia by reducing the time needed to search for structures that are potentially absent (Holmstrom et al, 1998).
Pre and post-procedural dental radiographs can provide assurance that there have been no roots retained during extractions and can detect any iatrogenic damage to alveolar bone as a result of extractions or other invasive dental procedures. This is not only beneficial in terms of client communication, but it also provides a sound medical record of the outcome.
Indications for dental radiography
Periodontal disease is a condition affecting some or all of the gingivae, cementum, periodontal ligament and alveolar bone. It is usually caused by inflammatory conditions such as gingivitis or periodontitis, which commonly result from accumulation of excessive plaque and calculus (Hennet, 1999). Periodontitis is one of the most common diseases identified in routine practice and since it affects the subgingival tissues, it is not always grossly visible in its early stages (Girard et al, 2009; Hoffman et al, 2007).
Clinical indications of periodontitis include tooth mobility, gingival recession, and frequently, severe gingivitis. Any suspected periodontitis requires thorough radiography of the oral cavity.
Radiography may be indicated with other oral pathologies including orofacial trauma and pain, dental attrition, odontoclastic resorptive lesions and missing teeth, to name just a few (Table 1).
|
|
Dental radiographs are essential to accurately assess and diagnose periodontal pathology (Holmstrom et al, 2005). In cats it is particularly important to routinely radiograph all of the dentition due to the nature and development of feline odontoclastic resorptive lesions (FORLs). In one study, dental radiographs on animals with no apparent dental pathology revealed clinically relevant findings in 27% of dogs and 41% of cats, and in patients that had obvious periodontitis, radiographs revealed additional sites of disease in at least 50% of the cases (Verstaete et al, 1998). This illustrates why dental radiography can be useful not only in providing thorough dental treatment, but also for routine dental prophylaxsis.
Dental radiographic equipment
Dental radiography equipment is specialized for the task. A typical unit is composed of a long arm, tube head and control panel. It may be mobile (on wheels) or fixed to a wall. The tube head is small and has an extending cylinder called the position indicating device which allows adjustment of the beam size and reduction of scatter. The unit’s articulating arm allows it to be easily manipulated around the patient’s orofacial anatomy and the tube head itself contains a movable collimator that can be used to adjust the beam size and help to control scatter radiation (Lewis and Miller, 2010).
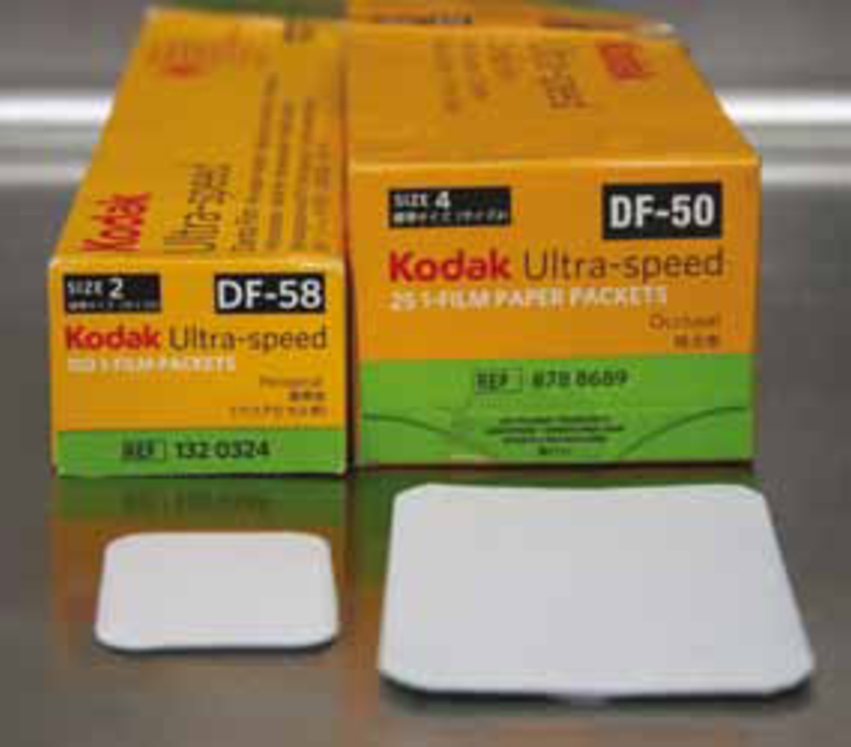
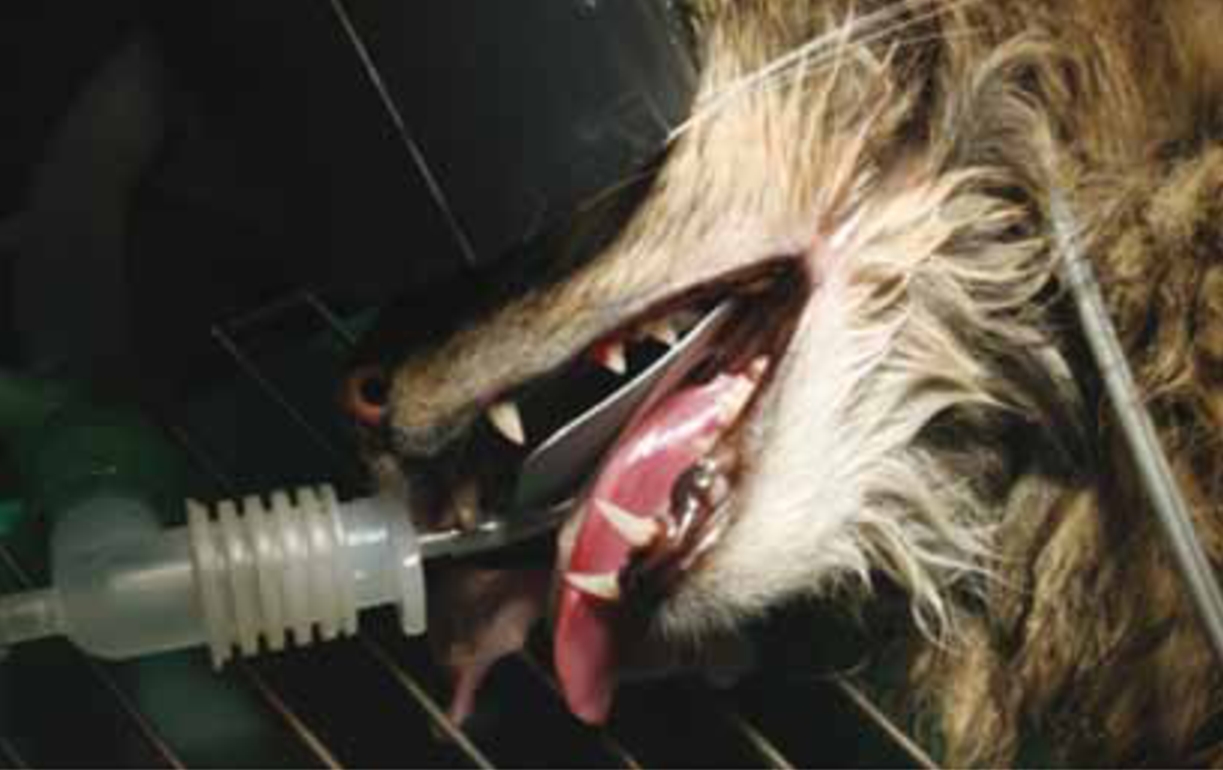
The small, moisture-proof design of dental film packets enables them to be inserted into the oral cavity at various angles (Figure 3). Each nonscreen film packet is designed with a lead foil on one side preventing scatter radiation from affecting the beam side of the film. There is a small raised dot on one side of the film indicating the side that must be oriented toward the primary beam. There are four common film sizes (Table 2).
| Size | Dimensions | Common name | Use |
|---|---|---|---|
| 0 | 7/8” x 1-3/8” |
Pedo | Small cats, exotics and small dogs |
| 2 | 1-1/4” x 1-5/8” |
Adult | Cats and dogs of all sizes |
| 3 | 1-1/16” x 2-1/8” |
Bitewing | Uncommonly used in veterinary practice |
| 4 | 3” x 2-1/4” |
Occlusal | Large teeth in dogs and extra-oral rabbit skull radiographs (dependent on rabbit size) |
Dental radiography equipment may be specialized, but it is not limited to dental procedures; it has many uses with small animals such as neonates, birds, fish, reptiles, rabbits and small rodents.
In contrast to equipment designed specifically for dental radiography, standard radiography equipment can be used for orofacial radiography however standard skull views are insufficient for evaluating dental pathology (Holmstrom et al, 2005). Larger films have to be positioned extra-orally and the resultant image may not be as detailed due to superimposed bone and soft tissue over the area of interest. Many standard x-ray machines are also large and immobile so the patient must be carefully manipulated and specifically positioned under the tube in line with the vertical primary beam for radiographs to be taken.
Techniques for dental radiographs
There are two standard techniques used in veterinary dental radiography, the parallel technique and the bisecting angle technique.
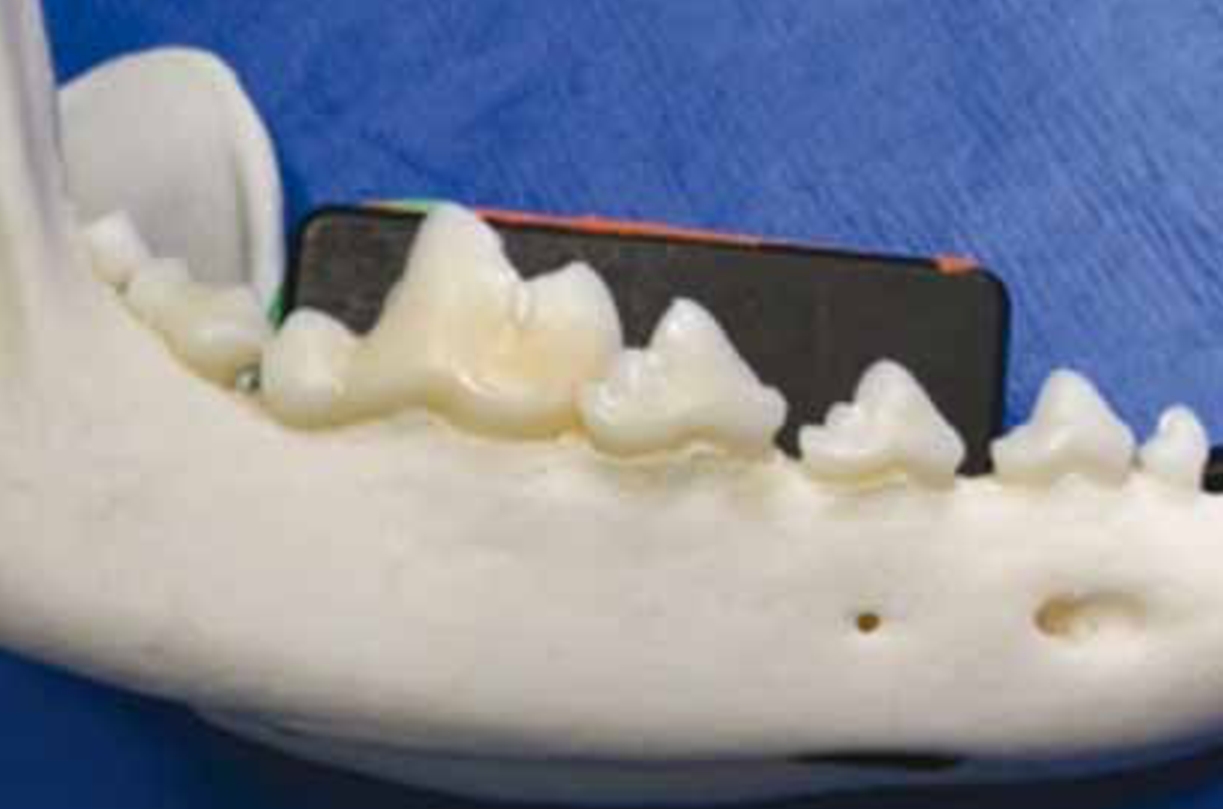
The parallel technique uses a simple theory of lining up the film and tooth parallel to each other with the primary beam at 90° to the film (Figure 4). This technique is most commonly used for imaging the mandibular molars and pre molars, although the mandibular symphysis and associated soft tissue structures can sometimes preclude the use of the parallel technique for the most rostral premolars.
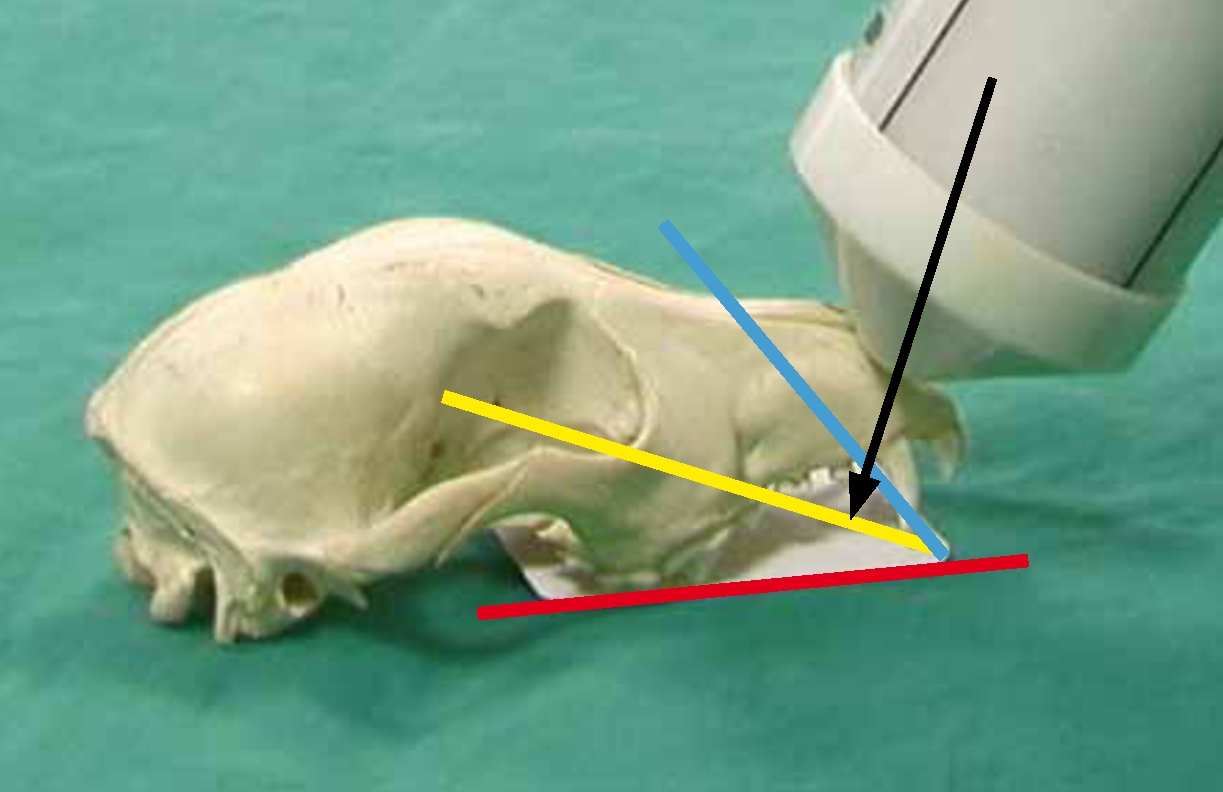
The bisecting angle technique is used for imaging teeth where it is impossible anatomically to achieve a parallel orientation. In this technique, the film is positioned at an angle behind the tooth or teeth in question. It important to be knowledgeable of root morphology to avoid missing the root apex. The plane of the film is identified, as well as the plane of the root(s) before identifying the bisecting angle, which is half way between the film and root planes. The primary beam is then directed at 90° to the bisecting angle to avoid distorting the final image (the image can be either foreshortened or elongated due to inaccurate angles being identified) (Figure 5a and b).
An additional technique, the occlusal technique, is sometimes used to visualize larger areas of the oral cavity and can be useful in viewing the nasal passages. In this technique the beam is placed at a right angle to the film.
Developing dental radiograph films
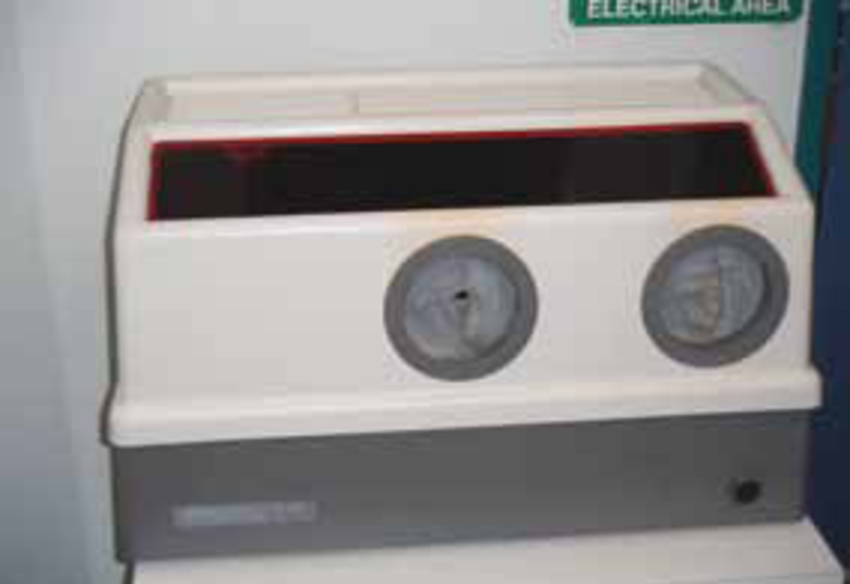
Developing dental radiographs can be carried out using standard developing equipment or equipment designed specifically for dental film. A chairside developing unit has the advantage of taking up a small amount of space and there is a minimal amount of chemicals used compared with a manual system for ordinary sized radiographs (Figures 6 and 7). The chair side units are light proof with small sleeves through which the hands can be inserted. Inside are small containers for developer, fixer and water. The top of the unit has a limited wavelength red window that allows sight into the box while preventing light from exposing the film.
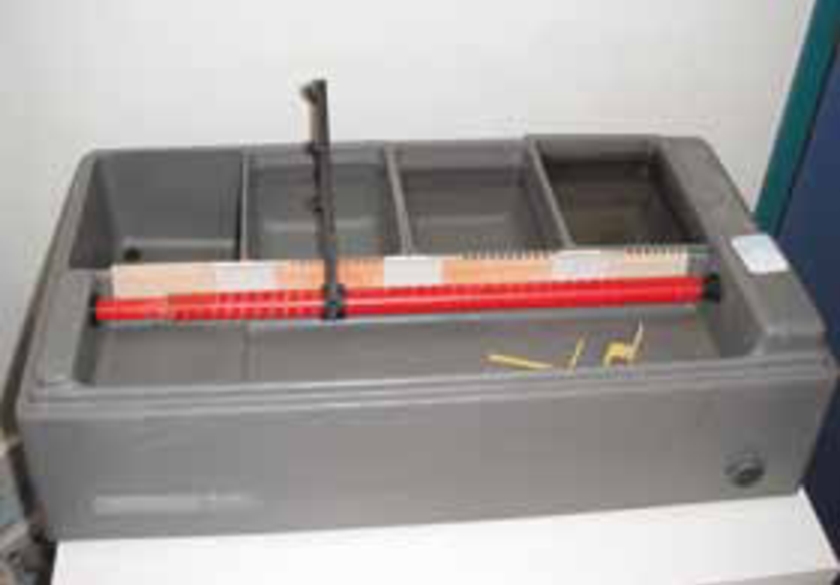
Inside the chairside developer are chambers for developer, water and fixer. The film is attached to a black lever which rotates on a timer dipping the plate into each chamber for 1 minute.
Many practices typically use a Rinn chairside developer (Dentsply, Weybridge), or a four bath system with developer, water rinse, fixer and water rinse. Instead of the films being dipped by the integral lever, the corner of the film is attached to a clip and dipping and agitation of the films in the chemicals is manually controlled according to the degree of developer/fixer exhaustion and temperature of the chemicals (Holmstrom, 2000). Manufacturer instructions should be followed at all times. When using Kodak rapid access chemicals, the manufacturer recommended developing times for room temperature chemicals and water are 15 seconds in the developer, a quick rinse in water, 15 seconds in the fixer, then the film can be viewed. For archival quality films they must then be fixed for a total of 2–10 minutes in standard fixer, then they should be rinsed in running water for 10 minutes, or soaked for 30 minutes in clean water and then dried. Times vary depending on the chemicals, temperature, and type of x-ray film used.
Case 1
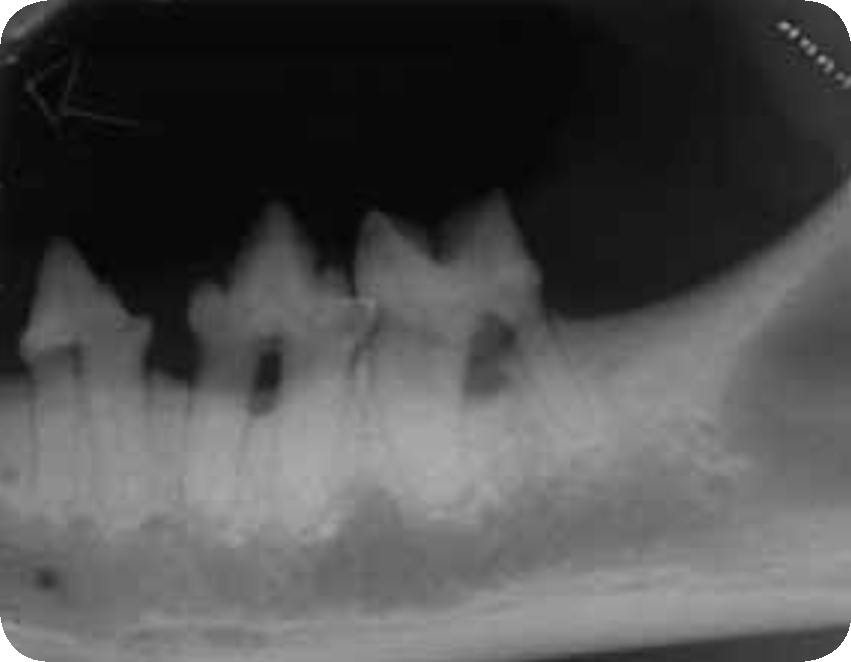
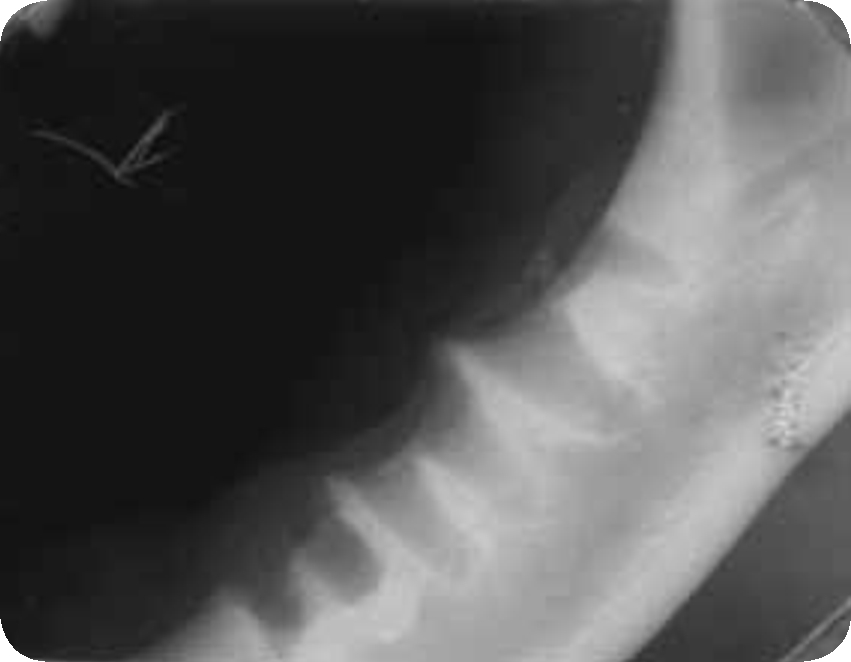
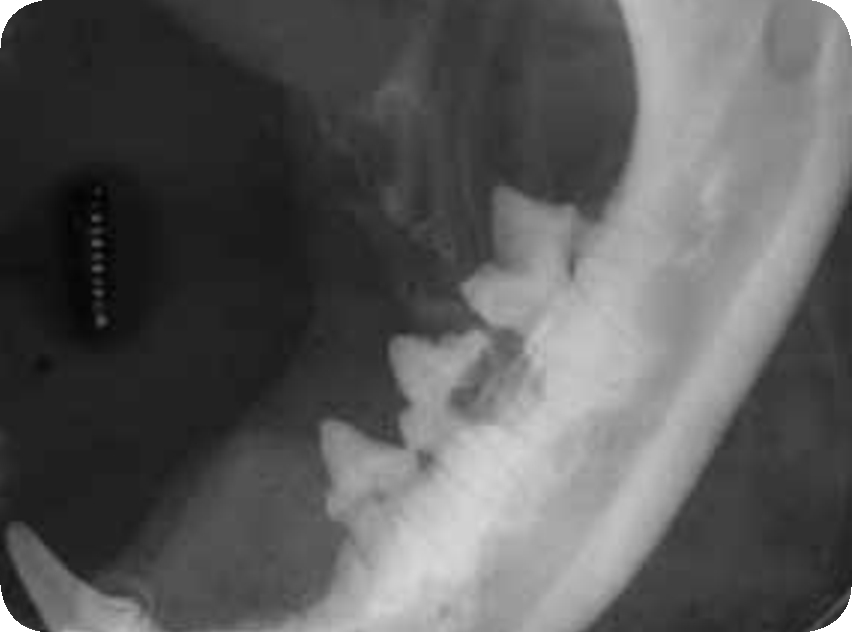
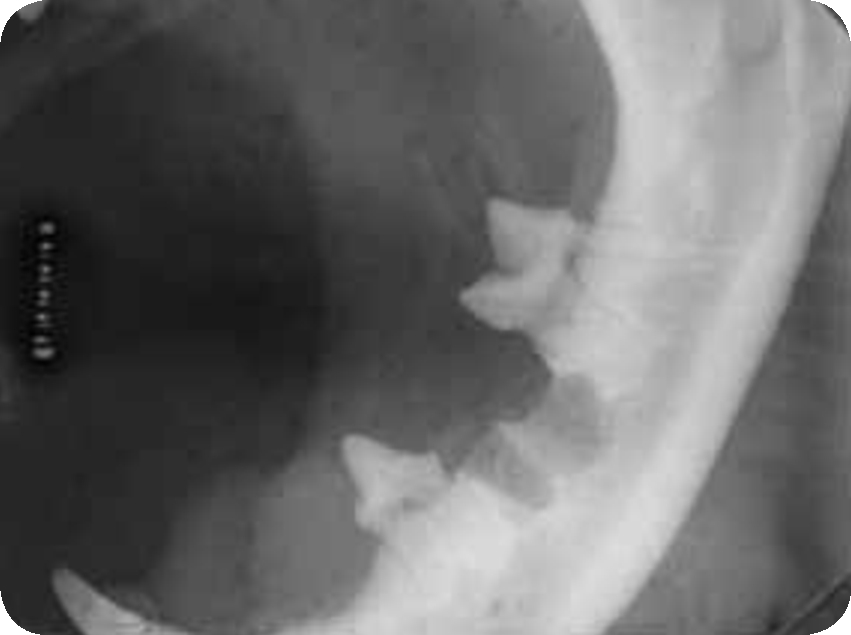
A 6-year-old feline, neutered male domestic short-hair presented with a history of recent weight loss and anorexia. On examination it showed signs of oral pain including chattering and salivation, depression, and reluctance to eat. The cat was admitted for a thorough dental examination as well as dental scaling and polishing. Periodontal probing revealed that 307, 308 and 309 had 4 mm gingival pockets, with grade 3 gingivitis. Dental radiographs were taken and they showed clinically significant bone loss around those teeth (Figure 8). Extraction was carried out and post-extraction radiographs revealed clean alveoli which were expected to heal quickly (Figure 9).
Case 2
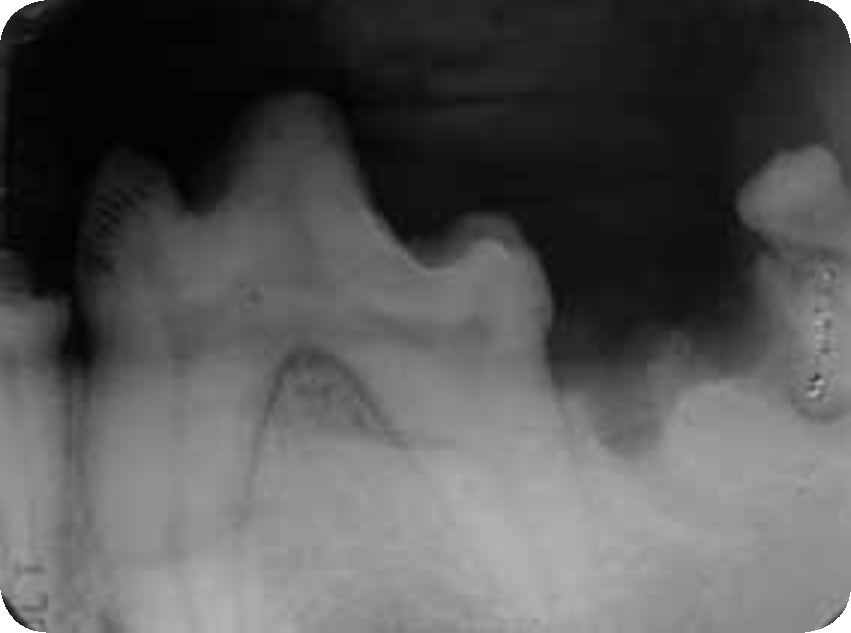
A 4-year-old canine, spayed female Siberian Husky presented for a yearly health check. It was noted that the patient had halitosis, mild calculus build up and grade 1 gingivitis in some areas. There were no signs of pain and the dog had been eating normally but it was noted that there was some mobility to 301 which is clinically significant in multi-rooted teeth. The dog was admitted for a thorough examination, dental radiographs and routine dental prophylaxis. The radiograph showed clinically significant horizontal alveolar bone loss and extraction was planned (Figure 10). Another key finding of the dental radiograph was a noteworthy kink in the mesial root of the tooth which could easily be broken during extraction due to the unexpected morphology so this was accounted for when carrying out the procedure. Post-extraction radiographs showed both roots were successfully removed with no damage to the surrounding bone (Figure 11).
Case 3
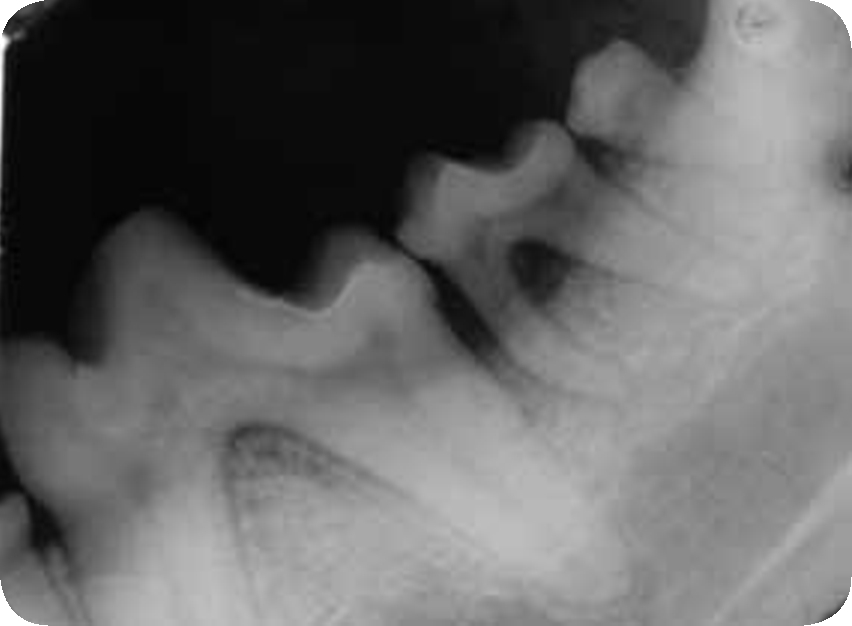
A 7-year-old feline, female spayed Persian presented for an annual health check. It was noted that the cat had unilateral heavy calculus and grade 1 gingivitis and was observed to only chew on one side of the mouth. The cat was admitted for a dental examination and a routine scaling and polishing. The teeth in the left upper and lower arcades, namely 307, 308, 309, 207 and 208 had extensive calculus accumulation. Despite being lightly anaesthetized, the cat’s jaw chattered when 308 was probed, which is indicative of pain. It was noted that the cat had a FORL associated with 308 so dental radiographs were warranted to assess the extent of root resorption prior to extraction to prevent unnecessary trauma to the alveolar bone trying to extract roots that are not there. The pre-extraction radiograph showed partial resorption of the caudal root only (Figure 12). Post-extraction radiographs showed a successful result (Figure 13).
Conclusion
Dental care in animals provides many complex challenges including those related to limited daily preventative care, client compliance and the inherent compact structure of the oral cavity. Infections of the oral cavity can pose significant health risks to patients so early detection and treatment is of critical importance. Dental radiography provides a noninvasive way to visualize sub-gingival tissues and it can help reveal occult dental disease in in the absence of obvious pathology. Considering the numerous benefits to patient health and the possibilities for improving diagnostic procedures in clinic, dental radiography is an essential component for any practice seeking to offer comprehensive dental care services.