
Fluoroscopy is an advanced imaging modality which uses real-time x-rays to produce moving images or still images of patients during procedures. It is primarily used for orthopaedics, gastrointestinal (GI) tract imaging and interventional surgery. Orthopaedic surgeons may employ fluoroscopy for fracture reduction and internal fixation procedures. It can also be used for intra-operative x-ray, and so may avoid the need for immediate post-operative radiographs obtained in a non-sterile environment. Studies of the gastrointestinal tract can be carried out by mixing food or drink with barium contrast agents. Real-time images then depict the motion of the mouth, pharynx, oesophagus and stomach as these items are ingested. Minimally invasive techniques employed in interventional radiology include stent placement and vessel embolisation. In these cases iodine-based contrast is injected into blood vessels which are then opacified for a short period of time, allowing the clinician to visualise the relevant anatomy.
Fluoroscopy is becoming more common in the veterinary context, and its operation may often come under the remit of a veterinary nurse, radiographer or veterinary surgeon. This article will examine the proper use of fluoroscopy, with an emphasis on radiation protection and image quality.
What are the risks?
Fluoroscopy uses x-ray radiation to produce moving or still images of the patient. In this respect many of the radiation protection issues have been addressed elsewhere in articles concerning x-ray safety (Baker, 2014). In comparison with most other imaging modalities, there is a higher risk from staff and patient exposure to radiation when fluoroscopy is being used (Hricak et al, 2011). This is due to the need for people to be present in the room while the machine is in operation, and the long exposure time in some cases when compared with regular x-ray use. Also, some fluoroscopic patient doses are amongst the highest used in diagnostic radiology (Sherer et al, 2011) and there have been numerous cases of human patients receiving skin burns as a result of high radiation doses in fluoroscopy (Shope, 1996; Vano et al, 1998; Wong and Rehm, 2004).
As with any radiological procedure, justification is extremely important. If the use of radiation cannot be properly justified then it should not be used (Baker, 2014). This principle is more important than all the other safety concerns put together.
Starting up
When first using the fluoroscopy unit it is imperative to consider the safety set-up of the room. A controlled area should be clearly marked out, and access should be strictly controlled (Baker, 2014). Most fluoro units can be simply switched on and set up, but require a key in order to operate the screening function. This key helps to prevent its use by unauthorised personnel, and also reduces the chances of the equipment being stolen. Many units have electrical circuit breakers built into the cable, whereas others will need a separate one at the plug socket. This will ensure electrical safety is maintained. Exposures can be initiated using either a foot pedal or a hand operated switch. Both of these are designed as ‘dead man switches’, which need continuous pressure to generate the x-rays. If the operator becomes incapacitated in any way then the exposure will stop immediately.
Source of radiation and exposures
The primary (i.e. useful) beam is produced by the x-ray tube at one end of the c-arm. It is directed at the detector at the other end of the c-arm, and cannot be made to fall anywhere outside of the detector (Figure 1). The detector is either an image intensifier on older units or a flat panel digital detector on newer units.

It is imperative that staff should not place any part of their body within the primary beam (Duran et al, 2013). This includes gloved hands where protective lead or lead equivalent gloves are used.
As the primary beam interacts with the patient and equipment such as the table top, scattered radiation is produced. This scattered radiation should therefore constitute the only source of radiation directed at staff members (Brateman, 1999). As scatter has less energy than the primary beam it is easier to stop with protective clothing, equipment and screens. It should be remembered that a larger patient requires a larger exposure, and will generate more scattered radiation than a smaller patient (Kim and Miller, 2009).
Reduction of radiation dose
Minimising the radiation dose used during fluoroscopy should be considered a primary goal of anyone operating the equipment, together with obtaining diagnostic images. In addition to improving patient safety, employing less radiation will produce less scatter and result in improved radiation safety for staff.
Scan time
Scan time is one of the most important considerations with respect to radiation safety, as it is proportional to the overall exposure used. Most units have an audible alarm which can be set to sound continuously when screening, or set to go off after a predetermined time — reminding everyone present that time should be remembered (Engel-Hills, 2006). It has been noted that the high level of concentration required by clinicians in theatre may distract them from thinking about radiation dose (Dendy, 2008). One of the best ways to reduce scan time is therefore to communicate effectively with the veterinary team, and to ask direct questions regarding the need for further screening.
Pulsed imaging has a major influence on reduction of scan time. By reducing the number of images acquired per second, the total exposure time and dose can be reduced by up to 70%. This has to be balanced against the need for temporal resolution or number of images per second (Duran et al, 2013). A higher frame rate is required for faster moving objects, such as vascular studies.
Collimation
The term collimation refers to restriction of the x-ray beam so that only the area of interest is exposed. Collimation is usually in the form of one or two pairs of rotatable shutters, or an iris-style shutter. Good collimation is important in several ways. First, it will reduce the amount of radiation the patient is exposed to, thereby increasing patient safety (Sherer et al, 2011). Second, it reduces the amount of scattered radiation produced. This scatter constitutes the main source of radiation exposure for staff, and also decreases image quality (Duran et al, 2013). Accurate use of collimation also has a benefit in terms of how the image is displayed, as it allows the system to optimise the contrast and brightness on the screen.
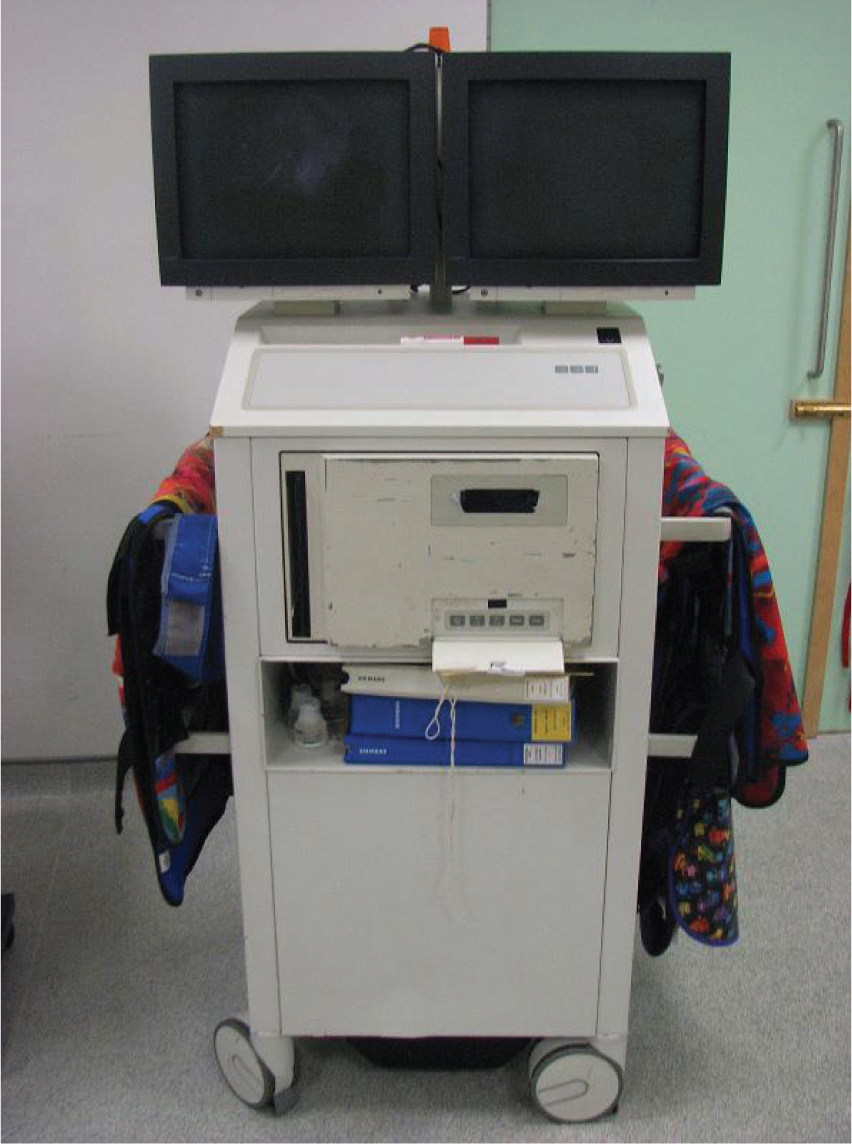
Last frame hold and screen swap
The ‘last frame hold’ function freezes the last live image on the screen when screening has stopped (Pooley et al, 2001), thereby showing the patient's anatomy without the need for further exposure. This image can then be transferred to a second display screen (Figure 2) to act as a reference, reducing the need to re-screen areas at a later time (screen swap). A great benefit of digital systems is the ability to replay video sequences as soon as they have been acquired, avoiding the need for repeating procedures.
Laser positioning tool
C-arm units have a laser positioning device which allows positioning of the patient so that the area of interest is in the centre of the detector. Lasers may be integral to the c-arm apparatus or purchased as an add-on piece of kit. As they avoid the necessity to screen the patient in order to find the correct anatomical area, both time and radiation exposure are reduced. It has been found that screening time can be shortened by up to 40% in some cases with this technique (Robinson et al, 1996; Conn and Hallett, 1998; Shuler et al, 2015). The laser also assists the surgeon in positioning and planning surgical procedures. With the anatomical area of interest in the centre of the laser target, procedures such as orthopaedic drilling can be optimised. For safety reasons the laser should not be directed at the eyes of patients or staff.
Exposure factors and image quality
Exposures for fluoroscopy can be set manually or automatically. Manually choosing exposures is similar to radiography, and is most often done for stationary images such as orthopaedic work. Providing an exposure chart to guide exposure settings is a simple way of reducing exposures when taking single images. Manual exposures are not recommended for procedures requiring moving images, as the resulting image quality and brightness are usually poor. The automatic exposure setting, termed Automatic Dose Rate Control (ADC) or Automatic Brightness Control (ABC), is more complicated in the way it works, but easier to operate. This varies the exposure in real time according to patient thickness and density, in order to maintain good image quality (Miller et al, 2010). Modern units will allow the selection of a body part or type of examination, such as cardiology, skeletal or abdominal. This will automatically select particular screening parameters which best fit the examination. Other automatic settings may include orthopaedics with metal present (changes the processing to show bone better), obese patients (gives a higher exposure) or moving patients (this has a faster frame rate or more images per second). For automatic dose modulation to work correctly, it is important to centre properly on the area of interest. Good collimation will also result in improved image quality when using ADC. It is essential to note that radiation attenuating gloves may be counter productive if introduced into the primary beam. This is because the ADC settings will recognise that there is an area which is particularly dense, resulting in an increased exposure to compensate (Kim and Miller, 2009).
High level control fluoroscopy (HLCF) is frequently employed for procedures requiring better quality images. HLCF operates with a higher exposure than normal, allowing better visualisation of small structures or those with poor contrast (Sherer et al, 2011). It is especially beneficial for interventional procedures looking at small blood vessels or catheters in theatre. Due to the increased radiation dose, it should only be used when absolutely necessary.
Reducing exposure to scattered radiation
The inverse square law
The basic principle of the inverse square law is that doubling the distance from a radiation source will quarter the dose. A person standing 0.75 m from the patient during fluoroscopy can therefore expect to half their radiation dose by simply increasing their distance to 1 m. In simple terms staff should be kept as far away from the source of scattered radiation, i.e. the patient, as possible. If the procedure does not require physical movement of the c-arm unit it is preferable to use the hand or foot exposure button; under some circumstances this can be achieved from outside the room. Shuler et al (2015) demonstrated small staff doses at 3 feet from the patient and no staff exposure at 6 feet from the patient. On a similar theme Jeans et al (1985) demonstrated that staff who moved away from the fluoroscopy unit during exposures received on average nine times less radiation dose than those who remained standing next to the patient.
Protective clothing and equipment
It is important to use protective equipment such as gowns, thyroid shields and screens in order to reduce staff dose as much as possible (Baker, 2014). A gown with 0.5 mm lead equivalent protection will stop 95% of scattered radiation from reaching the body during fluoroscopy (Kim and Miller, 2009). There are a range of protective screens available, either wall mounted or on wheels, which can greatly reduce the amount of radiation exposure to staff. Many of these are completely transparent, allowing better participation and observation (Duran et al, 2013). It has been shown that cataracts can develop following a certain level of exposure to ionising radiation. As relatively high staff eye doses can be achieved under some circumstances, protective eyewear is recommended (Sherer, 2011; Duran et al, 2013).
Various designs of arm, leg and head protectors are also available. There are a range of sterile surgical gloves which provide some degree of shielding against x-rays. While these are designed for surgeons where scattered radiation dose to the hands may present a problem, they are not designed to be placed within the primary beam (Baker, 2014). One other problem with these gloves is that their increased thickness may result in longer screening times due to reduced clinician dexterity.
Veterinary fluoroscopy usually involves screening in one of two planes, either cross table or under table. Although scatter can be produced in all directions, a greater proportion is directed back towards the x-ray tube, and this is called backscatter. With this in mind, for under table screening it is preferable to operate the c-arm with the detector above the patient and the x-ray tube below, as a greater proportion of the scatter will be travelling towards the floor rather than up towards staff members' bodies (Duran et al, 2013; Shuler et al, 2015). It has been demonstrated that taller people have a significantly lower dose to their heads due to an increased distance from the patient (Pratt et al, 1993). When considering cross-table fluoroscopy it is safer to stand behind the detector than behind the x-ray tube for the same reasons.
Other practical considerations
Digital subtraction angiography (DSA)
The most modern c-arms will have a DSA function, which removes bones and other radiodense objects from the image so that blood vessels can be demonstrated clearly. This works by first acquiring a short cine sequence of the area of interest called the mask. When contrast is injected into a blood vessel the mask is digitally subtracted from the image, giving an image of the contrast and vessels only. Low-contrast structures are then easier to see because the distracting background tissue is not shown (Pooley et al, 2001).
Post processing
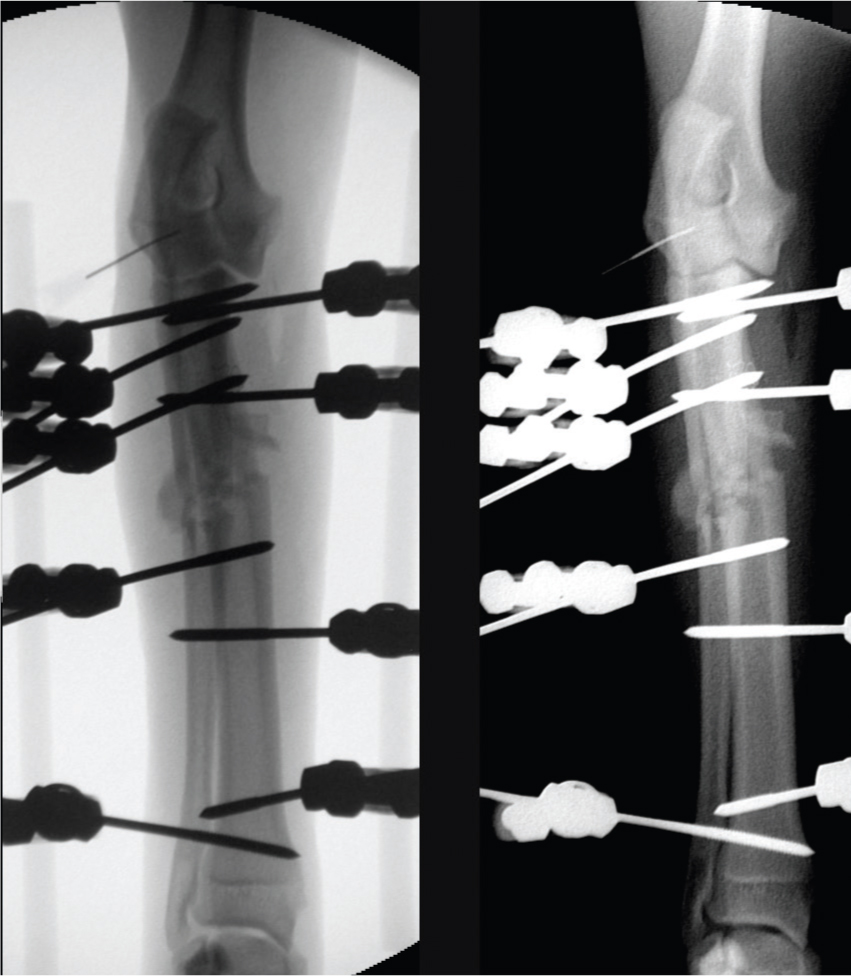
Post processing allows manipulation of the image quality and properties, much in the same way as is possible with digital x-ray. Producing the best quality images in this way improves diagnostic quality and also can reduce the need for post-operative radiographs. Features include image rotation, cropping, addition of edge enhancing and smoothing filters, contrast and brightness manipulation and annotation. A lesser known feature is the ability to invert images, making them more similar in appearance to traditional radiographs (Figure 3a and 3b). It is also possible with digital systems to produce more than one image from one exposure, allowing optimal display of different structures without the need for repeated exposures.
Recording exposures
It is important to make a record of exposures used during fluoroscopy. For older units, it is customary to record the exposure factors, screening time, and staff members present. More modern units will give not only screening time and exposures, but also an accurate dose record. The main reason for this is to ensure that exposures are not too high, either by recording an unusually long screening time, higher than normal dose record, or by monitoring badges showing high levels of staff exposure. If any exposures are too high, then an investigation can be made into the techniques used in order to prevent it happening again. A less common problem could be a fault with the c-arm itself.
Saving and printing images
Older units allow printing of images directly from the monitor apparatus. Usually this is done onto an acrylic-based substrate which is broadly similar to x-ray film, which can then be filed appropriately. Such images can be hugely beneficial as in some cases this negates the need for post-operative radiography in a non-sterile environment. If high quality images are required to replace conventional radiographs, it may be necessary to use a higher exposure setting to reduce noise. Newer c-arms will allow a variety of digital image transfer methods, including saving images to a memory stick or transferring to a PACS system in DICOM format. Images are also saved onto the carm's internal memory. It is important to check the c-arm computer has sufficient memory before each session, as this could lead to images not being saved. It is worth noting that there is usually a limit to the length of each cine-loop that can be saved, as sections longer than this may be missing data when reviewed later. It is often possible to edit video sequences before sending them to archive, removing unimportant sections which could take up valuable memory.
General safety points
The operator of the fluoroscopy unit has the responsibility to ensure that it is used properly and safely (Miller et al, 2010). This includes ensuring that only the minimum number of people are present in the controlled area while the exposure is being made. Other non-essential staff should be instructed to exit the room temporarily while the exposure is made. Staff present should be wearing appropriate protective clothing and equipment such as lead gown, thyroid shield and radiation monitoring badges. A verbal warning to staff that screening is about to commence is essential to prevent accidental exposure from the primary beam. The vast majority of c-arms have a light which illuminates during screening to act as another warning to staff that an exposure is being made.
Due to the large amount of data collected during cine fluoroscopy it may take some time to send saved data to the archive. In this case it is advisable not to leave the carm unattended when switched on unless the x-ray tube can be switched off separately from the rest of the unit.
Servicing and quality assurance should be performed regularly to ensure that image quality will be optimal and exposures are correct (Duran et al, 2013). In addition this will reduce the chances of failed procedures and wasted theatre time should the fluoroscopy equipment fail.
Training
Comprehensive training is imperative for staff involved in fluoroscopic procedures. It has been noted that untrained personnel operating fluoroscopy equipment are often unaware of the potential risks of radiation injury –—including radiation burns and cancer — to staff as well as patients (Archer, 2006).
In most circumstances training is delivered by a specialist from the manufacturer or supplier through a set training programme. In some instances an appropriately qualified person in the workplace may be able to perform this role. Training and professional experience have both been shown to affect the dose of radiation used in fluoroscopy (Hricak et al, 2011; Sheyn et al, 2008; Vano et al, 2006). This explains why clinicians with less experience tend to screen for longer and so end up using higher exposures (Kim and Miller, 2009). Bott et al (2011) demonstrated that using a simulator to train personnel in using fluoroscopy resulted in better image quality, shorter procedure times and lower doses. There is consequently a specific need for formal training programmes in fluoroscopy and radiation safety to be provided for veterinary staff before they are involved in operating fluoroscopy equipment (Archer, 2006).
Conclusion
Fluoroscopy is an extremely useful real-time imaging technique which can potentially result in high staff and patient radiation doses. Training and education in its use is essential in order to work safely and to obtain the best results.