Fine needle aspirates (commonly referred to as FNAs) are common diagnostic tools performed to obtain cytological information that could help aid in diagnosing veterinary patients. They can be performed on external or internal masses, or lymph nodes. Since veterinary nurses can perform FNAs on external masses and lymph nodes, it important for them to understand how to perform them correctly so a diagnostic sample can be obtained. This article will focus on two different methods of performing FNAs, and how to prepare the sample on microscope slides that will be used to obtain cellular information.
Fine needle aspirates (commonly referred to as FNAs) are diagnostic techniques used to help aid in the diagnosis of a veterinary patient. While they rarely provide a definitive diagnosis, they can provide fluid or cytologic information from both external and internal masses, and/or lymph nodes (Jaffe, 2006). External masses can include lesions in the epidermal, dermal, subcutaneous, and muscle layers, including lymph nodes (i.e. pre-scapular, submandibular, popliteal lymph nodes). Internal masses would include intra-cavitary lesions in the abdomen or thorax, including lymph nodes. This cytological information or fluid analysis can help direct further diagnostics and possible therapeutic plans.
FNAs on internal masses and lymph nodes can be performed safely with the aid of ultrasound machine guidance (Mauldin and Mauldin, 2006) and a certified veterinary radiologist to perform the FNA. Patients that need internal lesions aspirated generally are sedated or are under general anaesthesia to prevent movement during the procedure. While intra-cavitary FNAs require specialised equipment and training, FNAs on external masses and lymph nodes can be performed on a conscious patient by a veterinary nurse or doctor of veterinary medicine.
Since veterinary nurses can perform FNAs on external masses and lymph nodes, it important for veterinary nurses to know how to perform them correctly to maximise the chance of obtaining a diagnostic sample. Therefore, this article will focus on two different methods of performing FNAs on external masses and lymph nodes.
Equipment needed for FNA
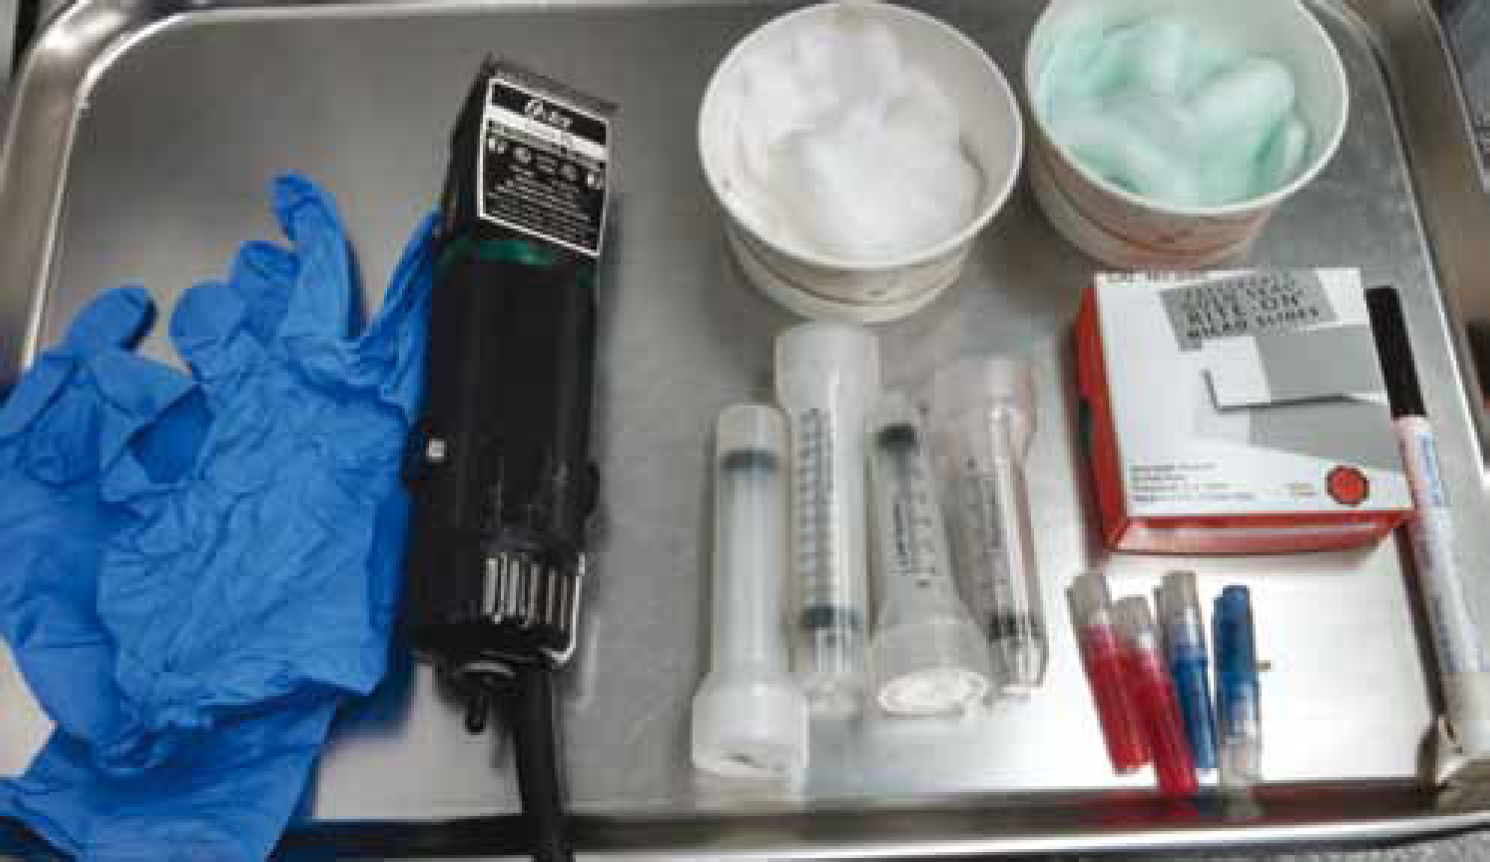
Various pieces of equipment are required for obtaining a FNA (Figure 1):
Clippers (optional)
Non-sterile gloves
Aseptic scrub — chlorhexidine and alcohol, or pourable sterile saline (optional)
22–5 gauge needles
6–12 cc syringes
Microscope slides
Slide marker.
Figure 1. Materials needed for fine needle aspirates. Clippers and aseptic scrub are optional.
Prior to performing FNA for either of two methods
Have an assistant restrain the patient so the mass or lymph node is optimally positioned to be aspirated.
If desired, use clippers to remove the hair directly over the mass or lymph node. After donning the non-sterile examination gloves, aseptically scrub the shaved area alternating chlorhexidine and alcohol (or pourable sterile saline) until the site is clean. Cleaning the site of aspiration will help reduce the chance of contamination (Jaffe, 2006) and infection (Scorer, 2008).
It is not always realistic or necessary to remove the hair over the lesion to be aspirated, and aseptically prepare it for an FNA; this is determined by the locality and condition of the lesion. Usually external lymph nodes and masses do not need to be clipped and prepared for FNAs. But lesions that are to be aspirated in a location with a higher chance of bacterial contamination should be clipped and prepared aseptically.
Method 1 of obtaining an FNA
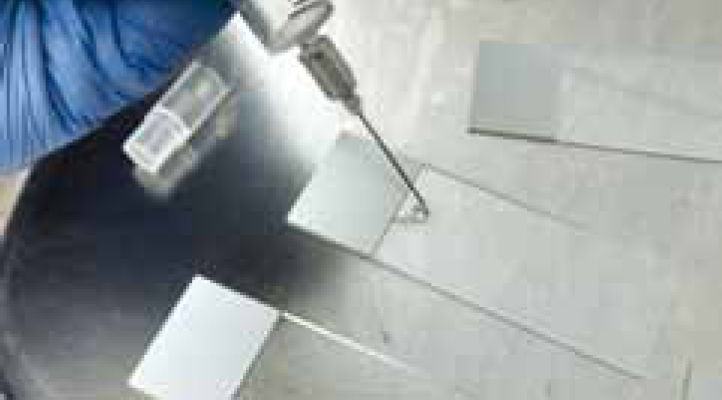
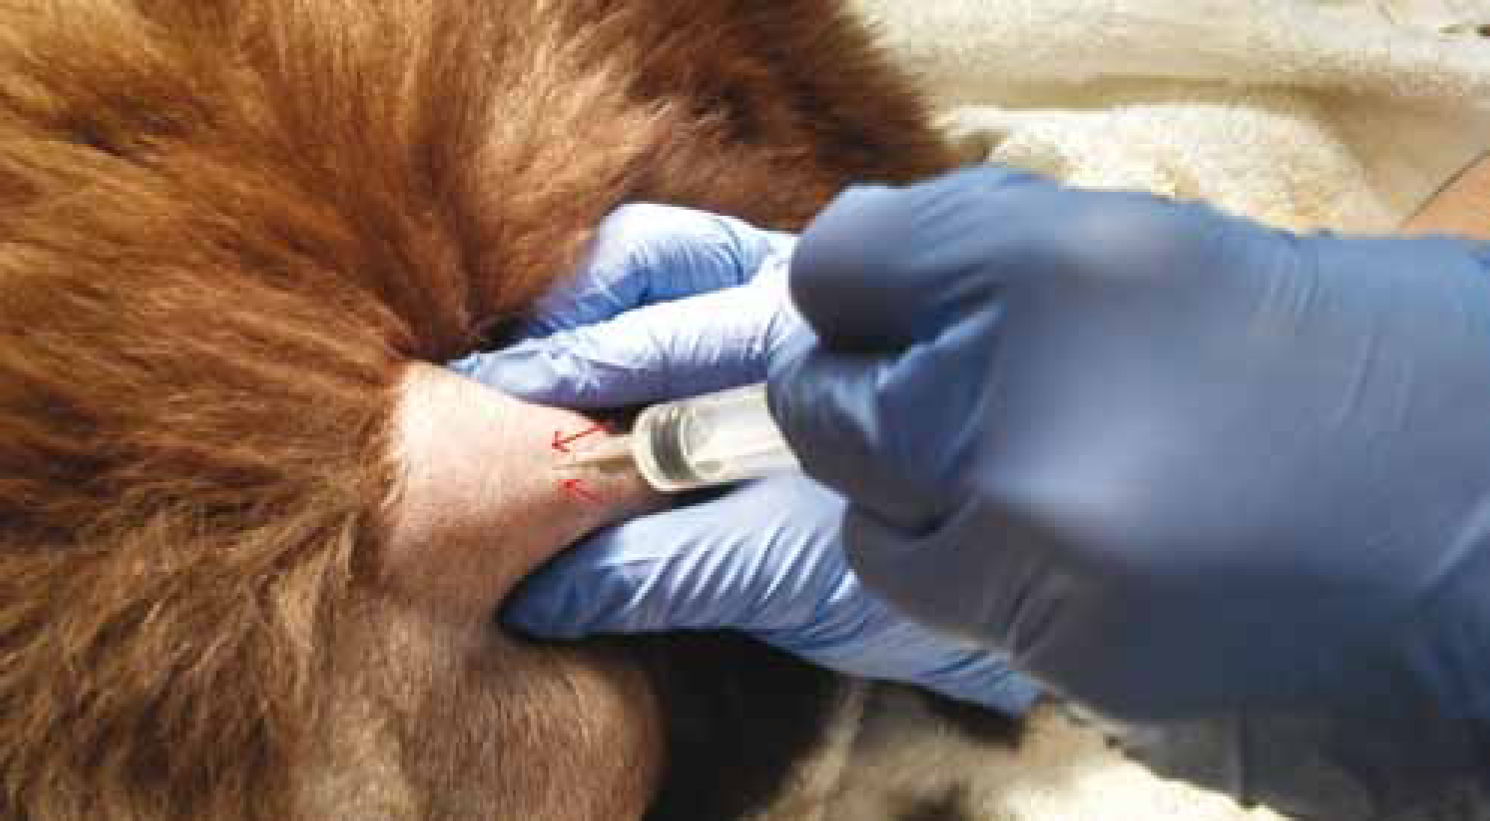
Wearing non-sterile examination gloves, isolate the mass/lymph node with one hand to prevent movement during the aspiration. This may require pinching the skin around the mass or lymph node. Insert a 22–25 gauge needle through the skin aiming to have the bevel of the needle in the center of the mass/lymph node (Figure 2). The size of the needle will depend on the size, depth, and location of the lymph node/mass. For example, large subcutaneous masses that are easily accessible should be aspirated with a 22 gauge needle to gather more cellular material, but in a lymph node, or mass, that is superficial and palpable, but in a location not feasible for aspiration, or in an uncooperative patient, a 25 gauge needle should be used so other tissue outside the lesion is not aspirated contaminating the sample. The needle is then redirected (pulled out slightly, then reinserted) two to five times without pulling the needle bevel out of the mass/lymph node before being removed (Jaffe, 2006; Scorer, 2008). This back and forth movement allows the needle to be packed with cellular material from the lesion being aspirated.
After the needle has been removed from tissue, attach a 6–12 cc syringe with the plunger already pulled back so that the syringe contains at least 1–6 cc of air. Pulling back on the plunger while the needle is still attached will allow the sample to be aspirated into the syringe, impairing the chance of obtaining a diagnostic sample.
Once the needle is attached, hold the needle/syringe over a microscope slide with the bevel of the needle facing downward toward the surface of the slide in front of the frosted edge.
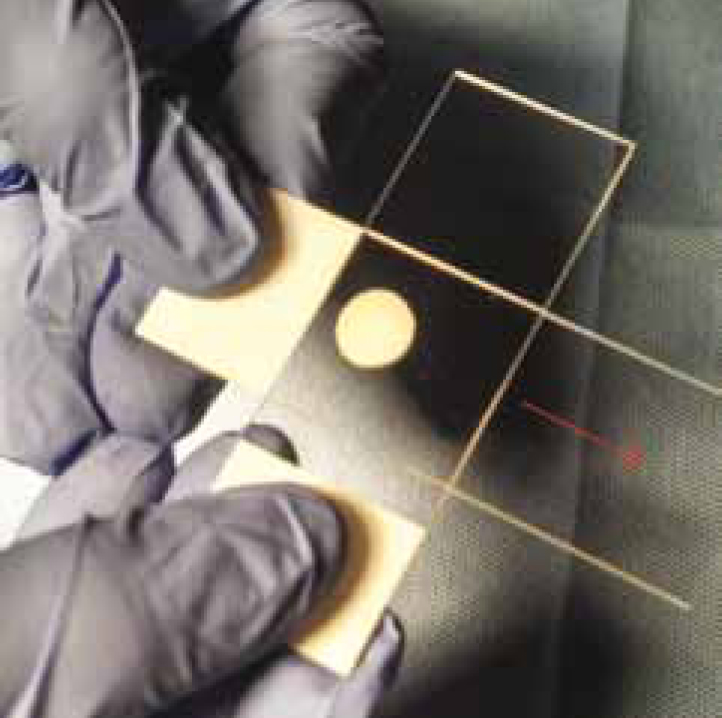
Forcefully depress the plunger of the syringe expelling the contents of the needle onto the slide (Figure 3). Remove the needle from the syringe, and place 1–6 cc of air into the syringe by pulling back on the plunger of the syringe. Reattach the needle to the syringe, and depress the plunger again so any further contents can be expelled on to new microscope slides. Repeat this until there are no further contents left in the needle.
Squash and modified squash preparations can be made to view the cellular contents under the microscope. These techniques are explained next.
Figure 2. After isolating the mass/lymph node, insert the bevel of the needle into the center of the mass/lymph node. Redirect the needle by pulling out the needle slightly and reinserting, a total of two to five times.Figure 3. With 1–6 cc of air place into the syringe, forcefully depress the plunger so the contents are expelled on the microscope slide in front of the frosted edge.
Squash preparation of cellular material on microscope slides
According to VanSteenhouse (2006), traditional preparations, such as those done for blood smears, can also be done to prepare the FNA sample on the microscope slide, but the squash preparation method may result in fewer broken cells:
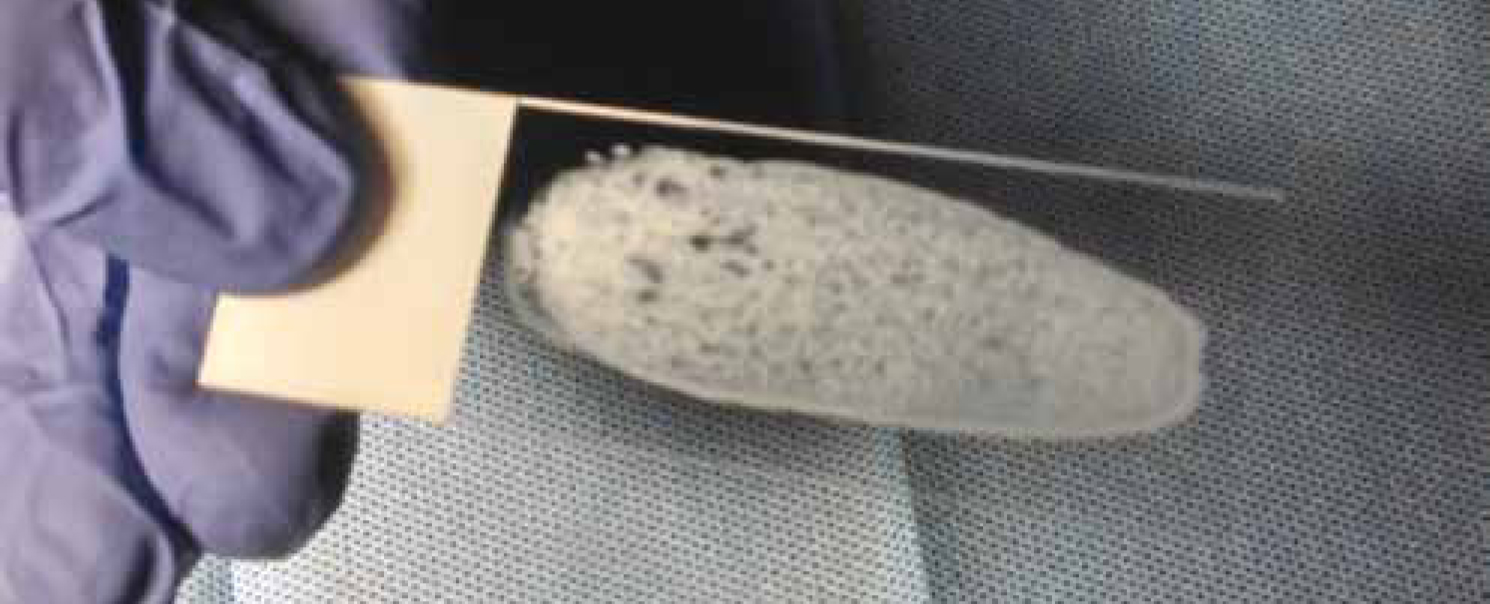
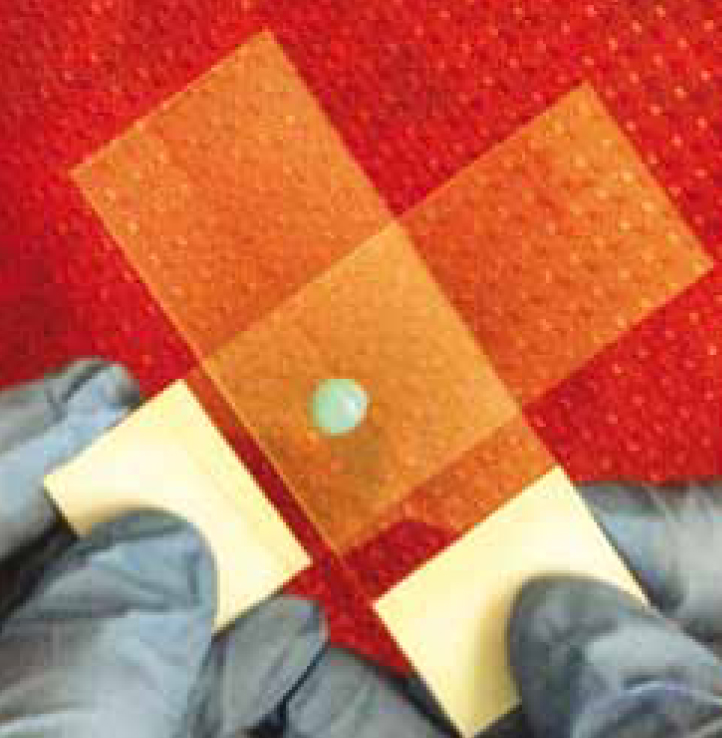
Take a new, unused slide and place it perpendicularly on top of the slide that has the contents of the FNA (Figure 4). Let the weight of the slide distribute the sample. Applying manual weight can disrupt the integrity of the fragile cells and impair the chances of obtaining a diagnostic sample.
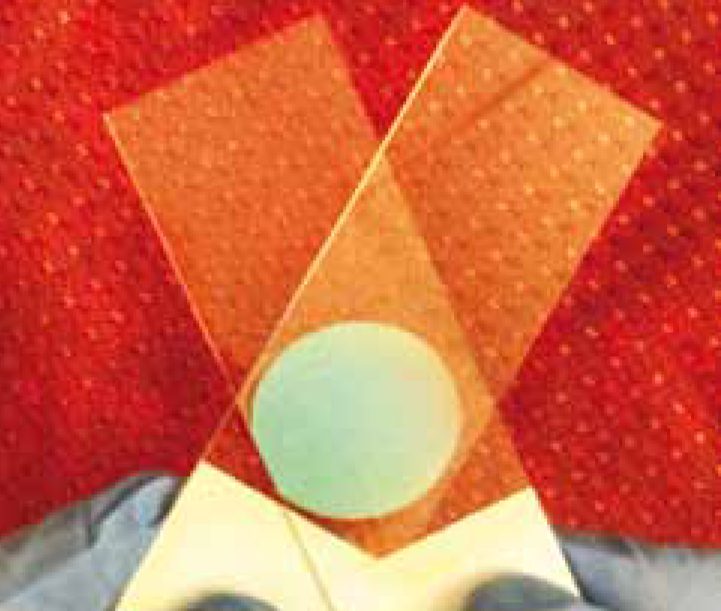
Once the contents of the FNA start to spread, slide the top slide across the bottom slide (Figures 5 and 6). Take care not to apply excessive pressure to the slides or slide the top slide too rapidly as this could distort some of the cells in the sample (VanSteenhouse, 2006).
Figure 4. Place a new, unused microscope slide perpendicular on top of the slide with the sample. Allow the weight of the slide distribute the sample.Figure 5. Spread the top slide across the bottom slide.Figure 6. Finished sample after smearing.
Modified squash preparation of cellular material on microscope slides
The modified squash preparation is similar to the squash technique, only the sample is not smeared, which results in fewer broken cells (Caruso et al, 2002). It is best to do this technique with cells that are more prone to being ruptured, such as with lymphocytes:
As with the squash technique, lay a new, unused slide perpendicularly on top of the slide that has the cellular contents on it. Refer to Figure 4. Let the weight of the top slide ‘squash’ the material. Do not add any extra force to the top slide, as this can rupture and distort cells.
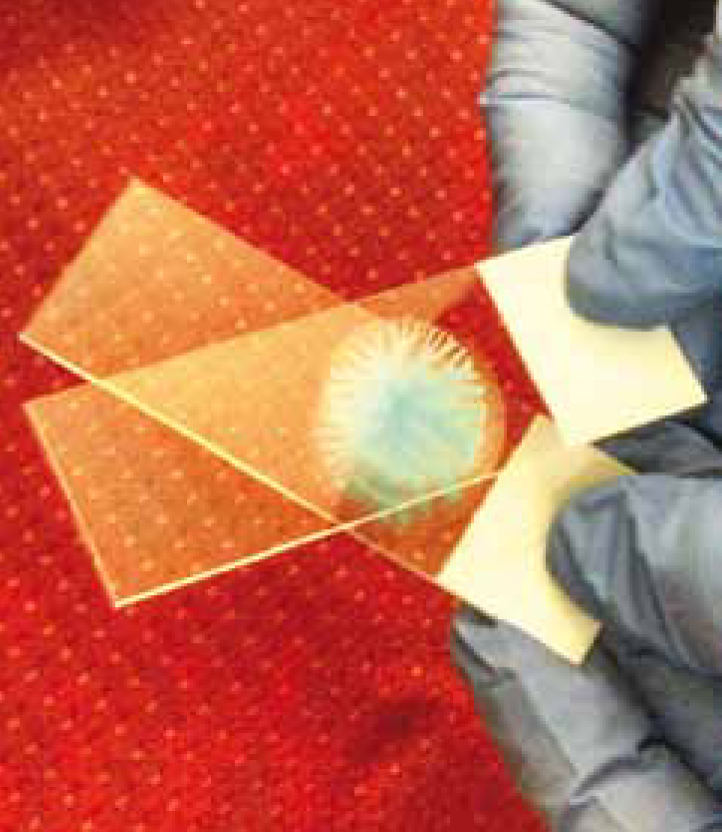
Take the top slide, and rotate it to a 45° angle to the bottom slide, make sure to add no extra weight to the top slide when moving (Figures 7a and 7b).
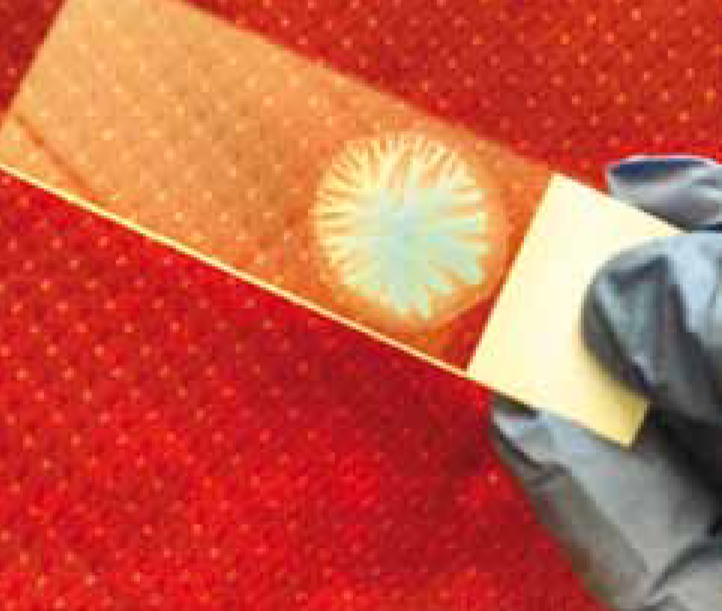
Next, lift the top slide straight up off the bottom slide (Figures 8a and 8b).
Figure 7a. Step 1 — lay a new, unused microscope slide at a 90° angle to the bottom slide that has the cellular sample on it.Figure 7b. Step 2 — turn the top slide so it is at a 45° to the bottom slide.Figure 8a. Gently lift the top slide off the bottom slide.Figure 8b. Finished sample after lifting off the top slide.
Method 2 of obtaining an FNA
Wearing non-sterile examination gloves, attach a 6–12 cc syringe to a 22–25 gauge needle. As with Method 1, the size of the needle will depend on the size, depth, and location of the mass/lymph node. After isolating the mass/lymph node with one hand, insert the needle with the syringe into the centre of the tissue to be aspirated with the other hand. Once the needle tip is in the core of the lesion, gently withdraw the plunger of the syringe. Do not use so much negative pressure when aspirating that contents from the lesion are pulled into the syringe (VanSteenhouse, 2006). Redirect the needle into the tissue (as with Method 1, only slightly pull the needle out, and then reinsert) and gently withdraw the plunger of the syringe. This should be done a total of two to five times (Jaffe, 2006; Scorer, 2008) before removing the needle completely from the tissue (Figure 9).
○ This method is the less of ideal of the two methods. It is performed when Method 1 is not providing a diagnostic sample. It is also useful for collecting fluid samples from lesions that are fluid filled. The pressure can negatively impact the diagnostic quality of the sample.
Remove the needle from the syringe. Pull the plunger of the syringe back and place 1-6 cc of air into the syringe. Pulling back on the plunger while the needle is still attached will allow the sample to be aspirated into the syringe, impairing the chance of obtaining a diagnostic sample.
Reattach the syringe to the needle. As with Method 1, hold the needle/syringe over a microscope slide with the bevel of the needle facing downward facing toward the surface of the slide.
Forcefully depress the plunger of the syringe expelling the contents of the needle onto the slide. Refer to Figure 3. Remove the needle from the syringe, and place 1–6 cc of air into the syringe. Reattach the needle to the syringe, and depress the plunger again so any further contents can be expelled on to new microscope slides. Repeat this until there are no further contents left in the needle.
Squash and modified squash preparations can be made so the cellular contents can be viewed under the microscope.
Figure 9. After placing the needle with the bevel in the center of the mass/lymph node, gently pull back on the plunger of the syringe. Then redirect the needle in the tissue by slightly pulling the needle out, and re-inserting. Do not remove the needle completely. This is done a total of 2–5 times.
Conclusion
To obtain a diagnostic FNA, it is important to follow either of the described methods and properly prepare the sample using the squash or modified squash technique. Veterinary nurses can play an integral part when FNAs are performed — either performing the procedure or assisting the veterinarian. It is important to understand how to perform a FNA correctly so a diagnostic sample can be obtained, and help aid in developing a treatment plan for the veterinary patient.
Key Points
Fine needle aspirates (FNAs) are diagnostic techniques used to help aid in the diagnosis of a veterinary patient.
FNAs can be performed on external masses (i.e. lesions in epidermis, dermis, subcutaneous, and muscle layer—including lymph nodes) as well as internal masses and lymph nodes (i.e. intra-thorax and intra-abdominal).
Since veterinary nurses can perform FNAs on external masses and lymph nodes, it important for veterinary nurses to know how to perform them correctly to maximise the chance of obtaining a diagnostic sample.
FNAs can be performed using two different methods.
Diagnostic samples can either be prepared using the squash preparation technique or the modified squash preparation technique.