
In order to perform a thorough assessment of the oral cavity and dentition, a veterinary nurse (VN) must possess a good level of knowledge regarding tooth structure, the relevant anatomy of the gingival margin and periodontium, and the different tooth types present in dogs and cats. In addition to this, they must be familiar with a lot of oral and dental terminology, dental formulae, tooth root morphology and standardised tooth-numbering systems. With this knowledge, the VN will be more confident at performing conscious oral examinations on patients. More specifically, the VN will also be better able to perform thorough assessments while the patient is under general anaesthesia (GA). The findings from these assessments under GA should be charted by the VN to provide information to the veterinary surgeon (VS) regarding the health of each individual tooth, who can then diagnose any problems, decide on which oral radiographs need taking by the VN and formulate the most appropriate treatment plan for the animal.
Tooth structure
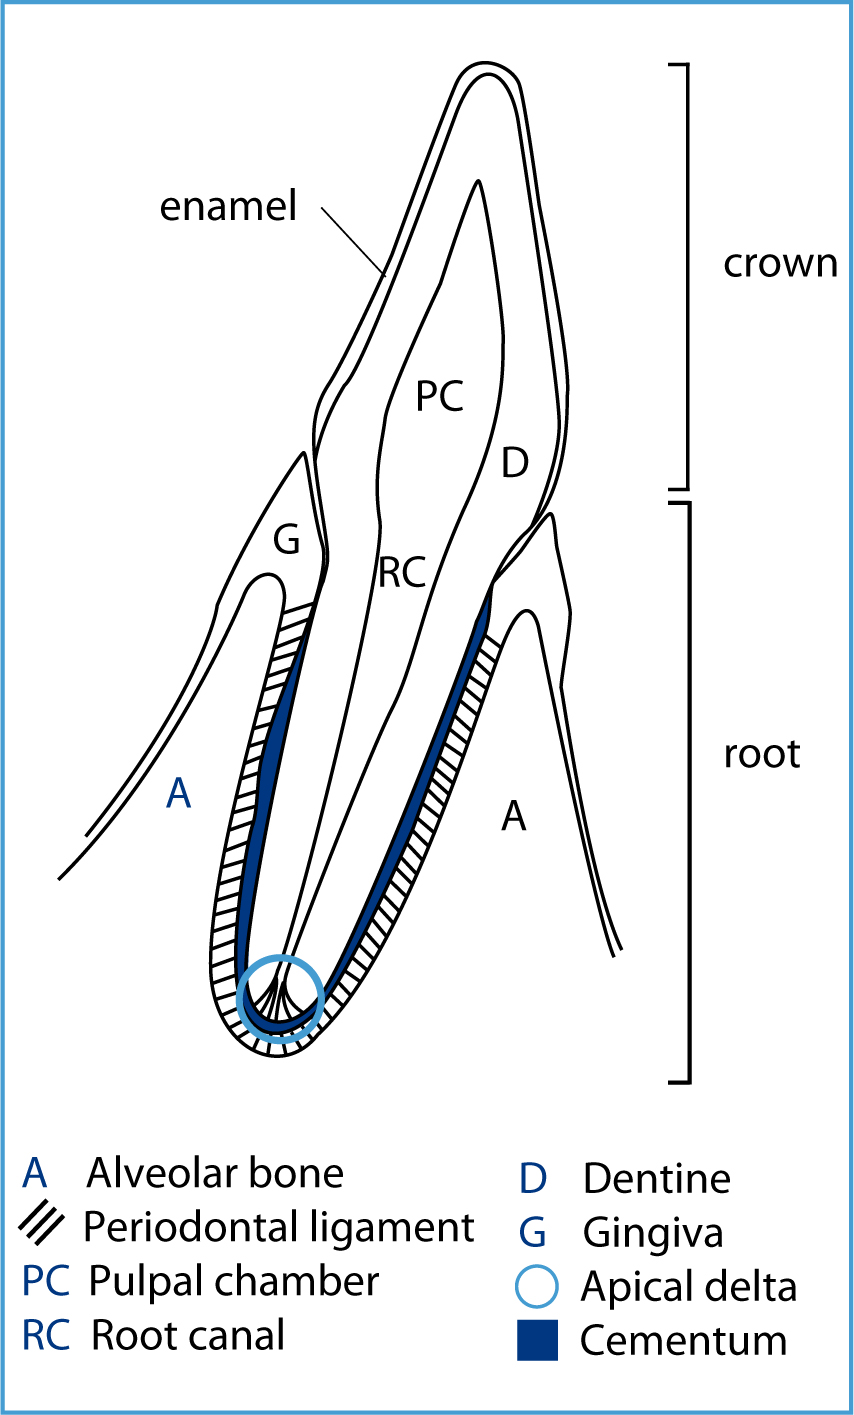
All teeth comprise enamel, dentine and pulp. Enamel is the hardest tissue in the body and is the external surface of all tooth crowns. Dentine forms the bulk of the tooth crown and root, and is porous, as well as less mineralised than enamel. As the animal matures more dentine is produced and laid down by odontoblasts, thus thickening the walls of the roots and narrowing the root canal. The pulp lies in the root canal and pulpal chamber and is responsible for the vitality of the tooth. It is a connective tissue which contains cells, collagen fibres, ground substance, blood vessels, lymphatic vessels and nerves. The apical delta is found at the tip of the root, and comprises numerous channels through which the blood vessels, lymphatic vessels and nerves access the tooth (Figure 1) (Gracis, 2013).
Gingival margin and periodontium anatomy
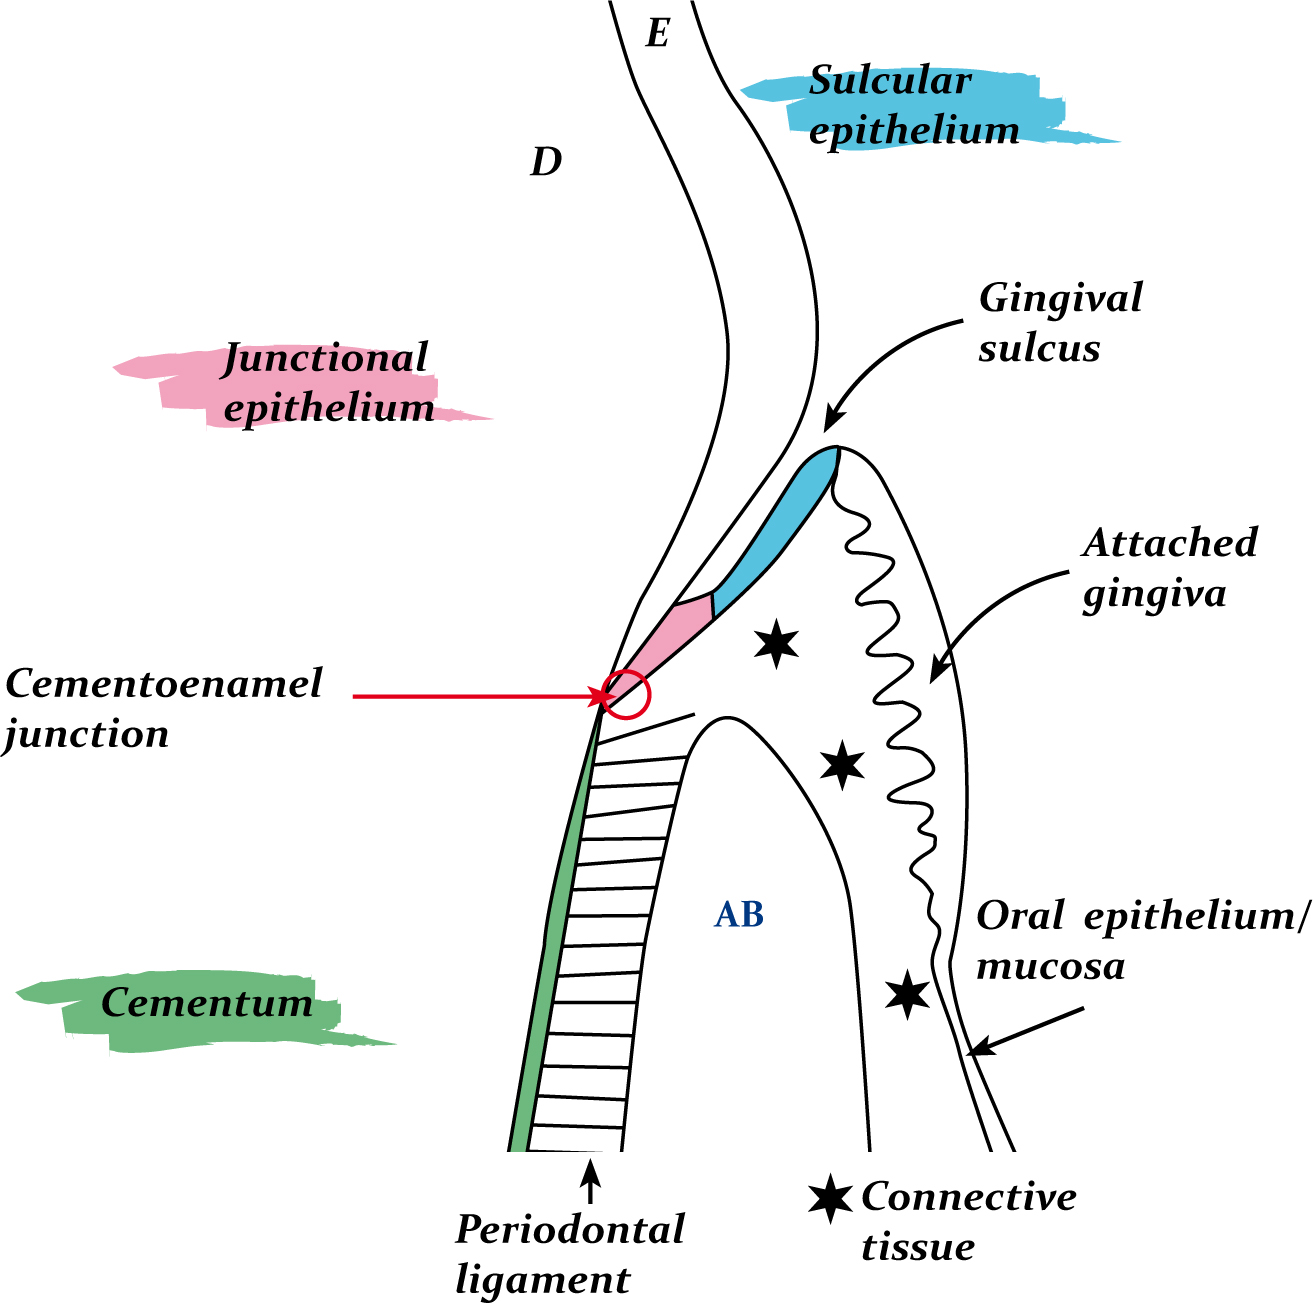
The periodontium consists of numerous different components, which support the teeth and keep them anchored securely within the maxillary and mandibular bones. It is important for the VN to be knowledgeable regarding the periodontium and gingival margin anatomy (Figure 2) as this is the main area of interest when probing the teeth and charting any problems found; this is where plaque is most troublesome.
The alveolar process is a ridge of the mandibular and maxillary bones, and the teeth sit in deep depressions in this bone, the alveolar sockets or alveoli. It is like any other bone, comprising a periosteum, and cortical and cancellous bone layers, and it appears with tooth eruption and disappears with tooth loss. The key difference between alveolar bone and other bones is a fourth layer called the cribriform plate which comprises the walls of the alveolar socket, and can be discerned radiographically as a radiopaque line called the lamina dura (Niemiec, 2010). The periodontal ligament (PDL) is made of a dense meshwork of collagen fibres, which are used to anchor the tooth to the alveolar bone via Sharpey's fibres, and act like a shock absorber during mastication. The PDL space also contains blood vessels, lymphatics, nerves, elastic fibres and cells, and appears as a black line around the tooth root radiographically.
While enamel covers the dentine on the coronal aspect of the tooth, cementum covers the dentine of the root. Cementum is avascular and bone like, being denser than bone but less calcified than enamel or dentine. It is continually deposited through life, is important in tooth support, and has resorptive and reparative capabilities (Gorrel, 2004). The cementoenamel junction is located at the ‘neck’ of the tooth, at the gingival margin. The enamel of all teeth bulges towards the cemento-enamel junction, which serves to protect the free gingiva at the gingival margin.
The remaining structures to be aware of are the soft tissues surrounding the teeth, which are a part of the periodontium. The gingiva covers the alveolar bone of the maxilla and mandible and also surrounds the teeth. The gingiva that is tightly adhered to the periosteum is called ‘attached gingiva’, while the gingiva lying coronal to the cemento-enamel junction is called ‘marginal/free gingiva’ and forms the gingival sulcus. The point at which the attached gingiva meets the mucosa of the rest of the oral cavity is called the mucogingival junction. The gingival margin is created by the free gingiva, which is closely apposed to the tooth, is firm and pink and should taper to a point, forming a knife-edge relationship with the tooth surface. The internal lining of the free gingiva is the sulcular epithelium, and the apical portion of this is the junctional epithelium, which connects to the tooth surface (Gracis, 2013). The junctional epithelium and its attachment are important in relation to the maintenance of periodontal health, as this is the main seal between the oral environment and the underlying periodontal structures (Perry and Tutt, 2015).
The gingival sulcus is found around all teeth. It is an ideal place for plaque to accumulate and gingival crevicular fluid flows out from the base of the sulcus to bathe the tissues. The sulcus is the place where the VN gently inserts the periodontal probe until he or she feels the junctional epithelial attachment when assessing the periodontal health under GA.
Oral terminology
When assessing the oral cavity and dentition, the VN must have a good working knowledge of different tooth types, including the relevant terminology. Accurate records are required for a thorough and appropriate assessment. Table 1 details the relevant terminology a VN needs to be aware of when discussing teeth, the head, and the jaw-tooth relationships.
| Term | Definition |
|---|---|
| TOOTH SURFACES | |
| Coronal | In the direction of the tip of the crown |
| Apical | In the direction of the tip (apex) of the root |
| Labial | Surface of the tooth facing the lip |
| Buccal | Surface of the tooth facing the cheek |
| Vestibular | The labial or buccal surface of a tooth |
| Lingual | Surface of mandibular tooth facing the tongue |
| Palatal | Surface of maxillary tooth facing the palate |
| Mesial | The surface of the tooth that faces towards the mid-point of the dental arch |
| Distal | Surface of the tooth that faces away from the mid-point of the dental arch |
| Occlusal | Surface of the tooth that faces the crown of the opposite tooth in the opposite arch |
| HEAD | |
| Rostral | The surface or displacement towards the tip of the nose |
| Caudal | The surface or displacement towards the tail (back of the head) |
| Dorsal | Towards the back (dorsum — upper surface) of the animal |
| Ventral | Towards the belly (ventrum — underneath surface) of the animal |
| Maxillary | Relating to the upper jaw (includes the premaxilla) |
| Mandibular | Relates to the lower jaw (mandible) |
| JAWS | |
| Prognathism | Forward relationship of one jaw relative to the other jaw. Need to qualify the description by using either mandibular or maxillary to identify which jaw is ‘more forward’ |
| Retrognathism | One of the jaws is more caudal to its normal relationship with the other jaw. Again, this descriptive term needs qualifying by using either mandibular or maxillary to identify which jaw is ‘more caudal’ |
| Brachygnathism | Used instead of saying retrognathic sometimes. This generally implies a cause rather than solely describing the jaw relationship |
| Note: These are ‘relative’ relationships, which is the correct descriptive term, determined by assessing the number of teeth in the oral cavity and their spacing within the relative jaw bones | |
| TOOTH RELATIONSHIPS | |
| Incisor | Scissor bite. Upper incisors are rostral to the lower, with the cutting edge of the lower ones sitting on the cingulum of the upper ones |
| Canines | Lower canines occlude between the lateral (third) upper incisor and the upper canine |
| Premolars | Upper and lower are regularly spaced. Cusps of lower fourth premolar interdigitates between the crown of the upper third and fourth premolars. Rostrally, all upper and lower premolars keep the same interdigitation |
| Molars | Various occlusal surfaces of these teeth occlude with each other. Harder to evaluate than others |
| Crowding and rotations | Normal events during odontogenesis. May persist if the animal is brachygnathic and there is no anatomical room for the teeth to erupt and be correctly spaced out. Can lead to other problems, primarily malocclusions |
| HEAD SHAPES | |
| Mesaticephalic/mesocephalic | Medium length and with muzzle — ‘normal’ head shapes, such as a Labrador |
| Dolichocephalic | Long and narrow muzzle, such as a Borzoi |
| Brachycephalic | Short and wide muzzle, such as a Boxer or Pug |
Tooth types
Cats and dogs have different types of teeth according to differing functions, and these teeth have either one, two or three roots. These types and their descriptions are as follows (Gracis, 2013):
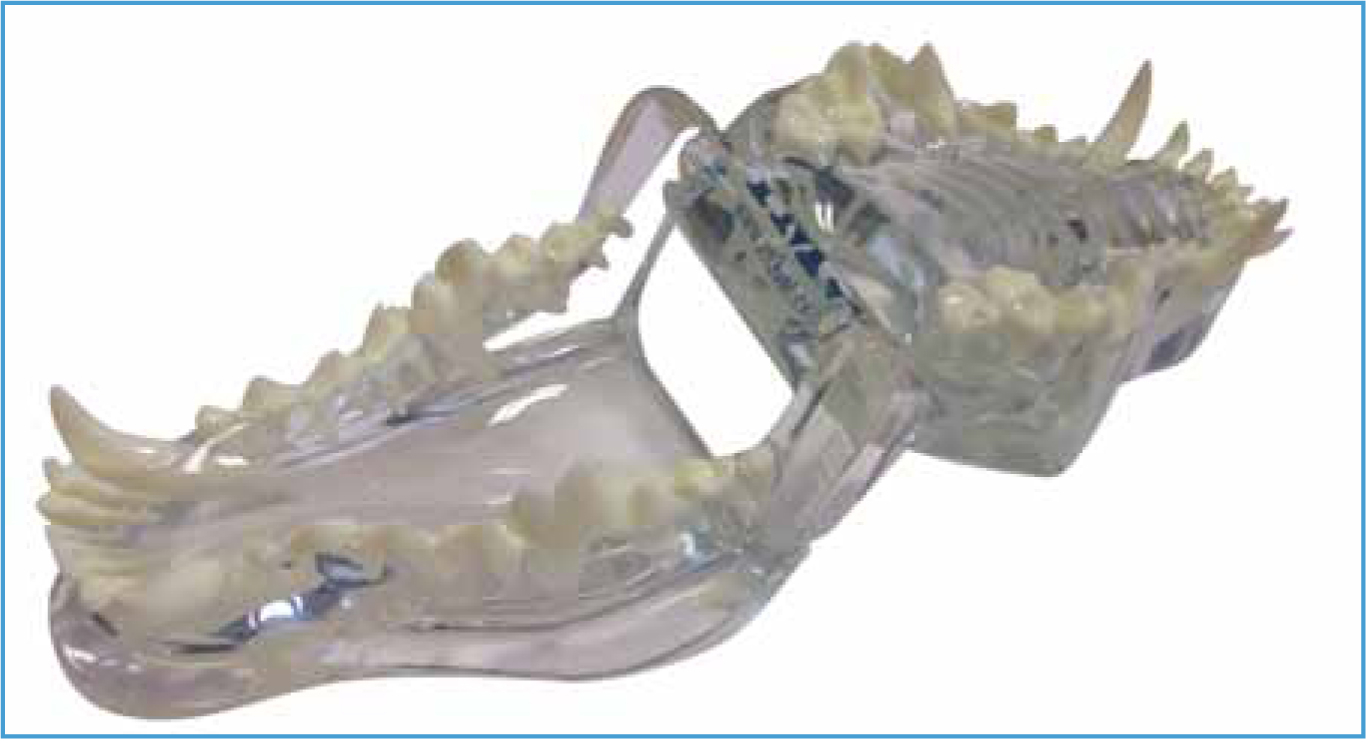
As the VN becomes more familiar with oral assessment, the numbers of roots for all of the teeth become easier to remember, but there are also models available on the market, which are excellent as a reminder of root morphology. There are some models made of a transparent material and the embedded teeth are white, facilitating a clear view of the shape and number of roots (Figure 3). These are good resources to use when trying to educate clients about oral health, as well as the need for oral radiography.
Dental formulae and nomenclature
A VN should be aware of how many teeth there are in dogs and cats, both when they are young and when they are adults. Dental formulae are presented, similarly to equations, where there is a top and a bottom number; these indicate the number of a particular type of tooth in the upper and lower quadrants on one half of the oral cavity. This total is then multiplied by two in order to calculate the total number of teeth in all four quadrants. The teeth are denoted as ‘I’ for incisors, ‘C’ for canines, ‘PM’ for premolars and ‘M’ for molars. The formulae are as follows (Gracis, 2013):
Dental nomenclature systems are used to provide a logical, precise, easy and standardised method of identifying and describing teeth. For identification of dog and cat teeth, the modified Triadan System is used which uses three digits to identify each tooth (Baxter, 2013). Initially the oral cavity is divided into four areas: the upper left and right quadrants, and the lower left and right quadrants which, in adult animals, are numbered 1 to 4:
This means, if the VN is talking about a tooth starting with the number 1, it must belong in the upper right (maxillary) quadrant. Puppies and kittens have deciduous teeth prior to the permanent adult teeth erupting. During the transition between these two sets of teeth, however, they may have a mixture of deciduous and adult dentition. This needs to be identified and recorded following dental examination, and the following numbers are used to denote the quadrants:
Therefore, if the VN is talking about a tooth starting with the number 5, it relates to the upper right quadrant but it is a deciduous tooth, not a permanent one.
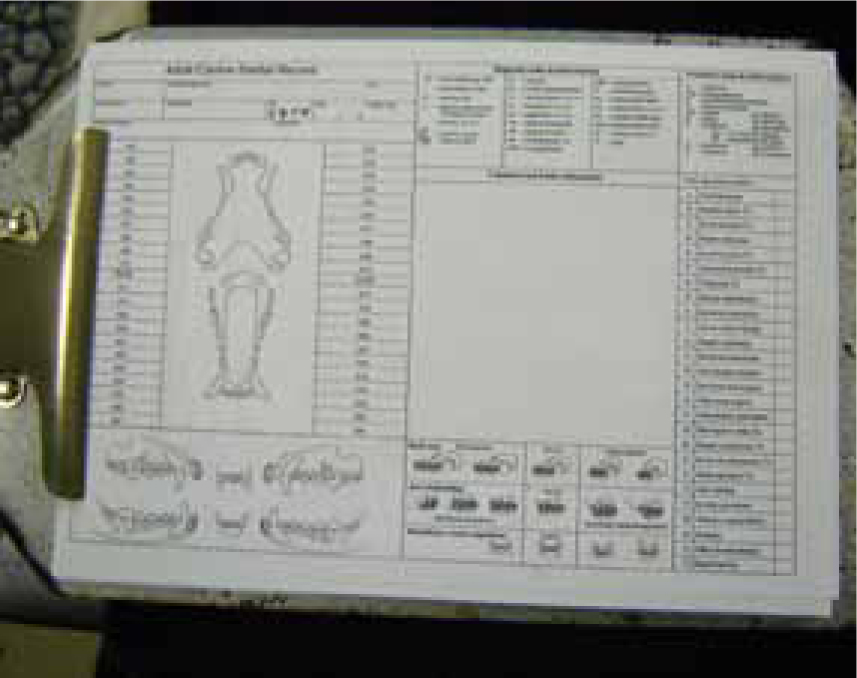
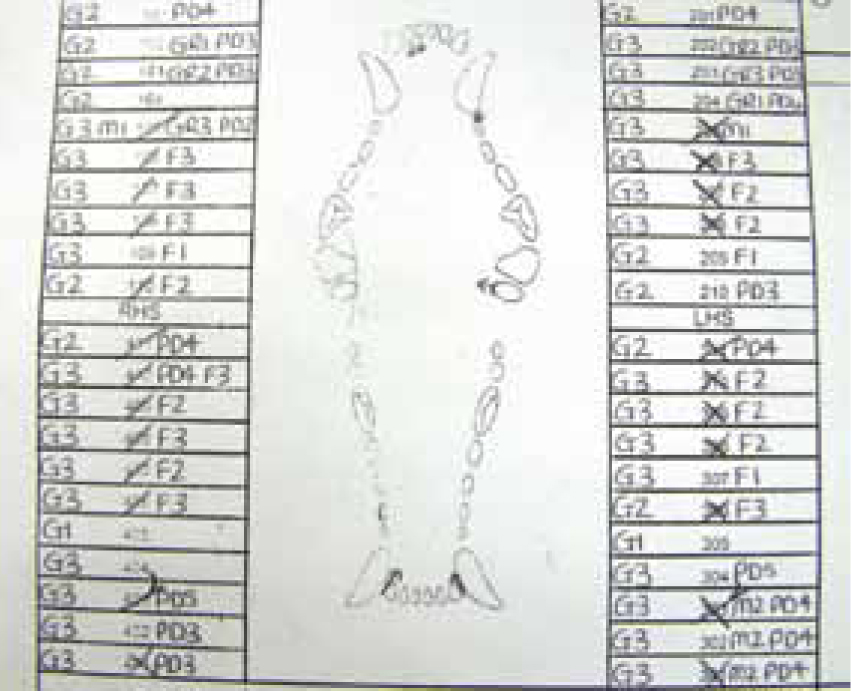
Having identified the quadrant the tooth belongs to, the individual teeth need to be differentiated from each other numerically, which is also standardised as per the modified Triadan System. Within the first quadrant chosen for assessment, the central incisor is tooth number 01, and then one works caudally through the quadrant. Therefore, the second incisor is 02, the third incisor is 03, the canine is 04, and so on. If this was the right upper quadrant, the VN would be considering 101, 102, 103 and 104 in this example. If this was the lower left (mandibular) quadrant, the VN would be considering 301, 302, 303 and 304 (Baxter, 2013). Good quality, species-specific dental charts are essential to assist the VS and VN's learning regarding the expected number of teeth, their locations and numbering.
Cats have fewer teeth than dogs, but still follow the same numbering system, so it is important that people involved in assessment of the feline oral cavity are aware of the teeth cats do not possess comparatively, and their numbers. As mentioned, this is most easy to learn if a comprehensive and accurate dental chart is used for all animals (Figure 4). Remembering the ‘rule of 4 and 9’ also helps when assessing the teeth; the canine tooth is always number 04 and the first molar is always number 09 in any of the four quadrants (Baxter, 2013).
Conscious oral assessment
Oral examination is, of course, an important part of a VN's job. It is also important to consider the animal's head as a whole before even opening the mouth to have a look inside the oral cavity. Conscious examination is the more limited form of assessment where the VN can visualise the animal and palpate them. However, VNs must do these things carefully as the animal may be in pain or uncomfortable, depending on their condition. During a conscious examination, the VN must assess the following (Baxter, 2013; Clarke and Caiafa, 2014):
The VN should be able to identify, and make a note of a variety of different abnormalities while doing the oral examination, such as fractured teeth, missing teeth, rotated teeth, overcrowding, tooth discolouration, abnormal growths, abnormal mucosae, ulcers, and evidence of destructive processes (Baxter, 2013).
Probing and charting
Charting, and keeping an accurate record of the findings is of paramount importance in veterinary practice. It means a picture can be built up about the health of each individual tooth and it can then be decided which teeth require treatment. The chart is also a legal document and, as such, enables the VN and VS to defend the treatment performed on an animal, should the animal's owner raise any issues (Baxter, 2013).
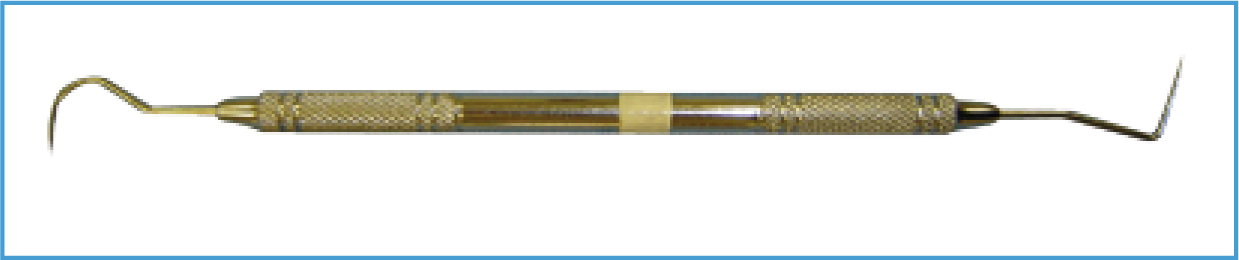
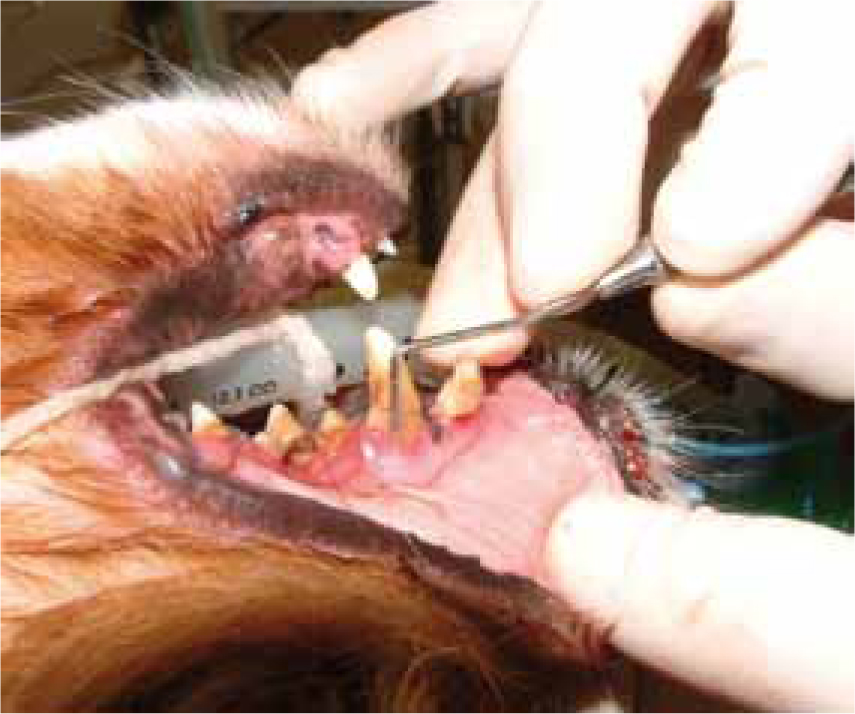
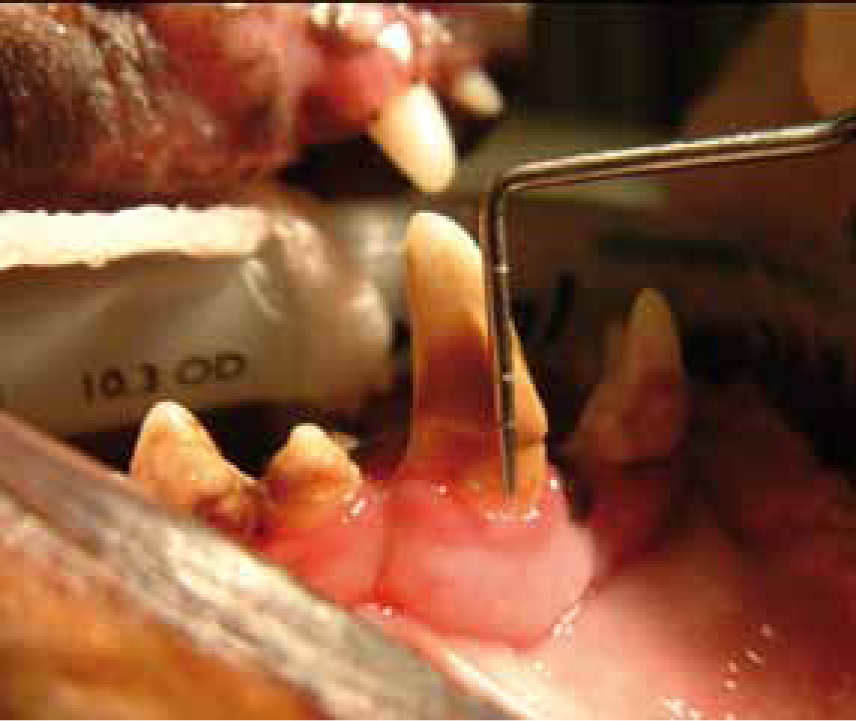
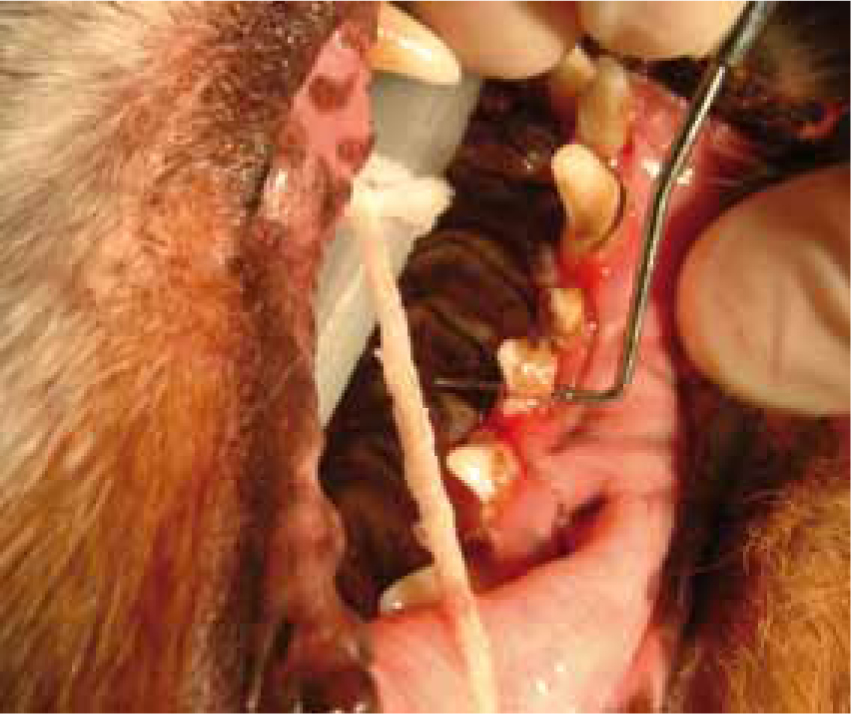
In order to assess the teeth, the animal must be under GA with a secure and protected airway, and a dental probe and explorer are required. The probe has a blunt end with millimetre (mm) graduations along it, as this is the end that is gently inserted into the gingival sulcus at various locations around a tooth to identify any problems, and to measure the probing depth. The explorer is the sharp end of the instrument which is used to explore and assess the enamel surface for defects (Figure 5). The VS and VN should probe the sulcus around each tooth in a methodical fashion, verbalising anything that needs recording on the chart. The probe should be ‘walked’ around the sulcus and not dragged to avoid damaging the sulcular tissues. It is recommended that one quadrant is assessed at a time, working from the central incisor (01) caudally. Probing and charting is essential to identify if there is any gingivitis and periodontal disease present. To differentiate between these two conditions, precise problematic areas should be identified and documented, thus assessing the amount of destruction present associated with periodontal disease. All of this information informs, creates and guides a thorough and appropriate treatment plan for each individual patient (Holmstrom et al, 2004).
The following parameters should be assessed and associated problems documented accurately on the chart next to the relevant tooth:
| Calculus Index ‘Score’ | Description |
|---|---|
| C0 (do not have to record this) | No calculus present |
| C1 | Supragingival calculus only |
| C2 | Moderate deposits of supra and subgingival calculus OR subgingival calculus only |
| C3 | Heavy deposits of supra and subgingival calculus |
| Gingival Index ‘Score’ | Description |
|---|---|
| G0 (do not have to record this) | Clinically healthy gingiva. Pink (or pigmented sometimes). Form a knife-edge with the tooth. No evidence of redness or oedema. Does not bleed when gently probed |
| G1 | Mild gingivitis: slight reddening of the gingiva (‘fronding’ — tiny blood vessels many be apparent on visual inspection). Slight swelling of the gingival margin but no bleeding on gentle probing |
| G2 | Moderate gingivitis: redness and swelling of the gingival margin is obvious. Gentle probing of the sulcus often results in bleeding |
| G3 | Severe gingivitis: the gingival margin is very swollen and red/red-blue in colour. There is usually spontaneous bleeding apparent, which often becomes more profuse on gentle probing of the sulcus. You may also see ulceration at the gingival margin |
| Furcation ‘score’ | Description |
|---|---|
| F0 (do not have to record this) | No furcation involvement. The probe immediately encounters alveolar bone |
| F1 | Initial furcation involvement: the operator can feel the furcation with the tip of the probe. Minimal horizontal bone destruction as the probe goes into the furcation less than halfway under the crown |
| F2 | Partial furcation involvement: horizontal furcation tissue destruction allows the probe in more than halfway under the crown, but not all of the way through |
| F3 | Total furcation involvement: the probe passes all the way through the furcation from the buccal aspect to the palatal/lingual aspect |
| Furcation ‘score’ | Description |
|---|---|
| M0 (do not have to record this) | No movement of the tooth within the alveolus |
| M1 | There is horizontal movement of the tooth within the alveolus of 1 mm or less |
| M2 | There is horizontal movement of the tooth within the alveolus of more than 1 mm |
| M3 | There is vertical as well as horizontal movement of the tooth within the alveolus |
These parameters are absolutely essential to assess and document for every tooth in order to establish whether the teeth and their attachments are healthy. Accompanying radiographs are recommended to fully appreciate the extent of periodontal disease as the bulk of the teeth, the attachments and the bone are sub gingival. Oral radiography truly is an essential and integral assessment tool in the provision of quality, informed dental treatment.
All dental charts have a ‘key’ on them, which provides an overview of abbreviations to use to document other important findings. These often include:
Other noteworthy symbols associated with charting include:
Conclusion
Knowledge of oral and dental anatomy is essential in veterinary practice to ensure all animals receive the best and most appropriate treatment. VNs can play a significantly important role in veterinary dental service provision if they have an interest, and having been educated about oral assessment, should be encouraged to implement probing and charting routinely in their practices. Whichever chart a practice decides to use will be a result of personal preference or recommendation. Some charts are more comprehensive than others; however, the use of any form of dental chart is better than neglecting to use one at all. All completed charts should be used to inform the update of the patient's clinical records on the computer, and should be filed safely. If the animal comes in for further dental treatment, it is wise to consult the previous chart in order to appreciate which teeth should be present for assessment. It is also a good idea to provide the owners with a copy of the dental chart and explain it to them at discharge, as it really makes them appreciate the often extensive work that has been done in their pet's mouth — and, more importantly, why this treatment was necessary.