References

American Veterinary Dental College. AVDC Nomenclature. 2021. https://avdc.org/avdc-nomenclature/ (accessed 10 September 2021)

Bellows J, Berg ML, Dennis S 2019 AAHA Dental care guidelines for dogs and cats. J Am Anim Hosp Assoc. 2019; 55:(2)49-69 https://doi.org/10.5326/JAAHA-MS-6933

Dugdale AHA, Beaumont G, Bradbrook C, Gurney M. Veterinary anaesthesia.Chichester: John Wiley & Sons, Ltd; 2020

Gengler B. Exodontics: extraction of teeth in the dog and cat. Vet Clin North Am Small Anim Pract. 2013; 43:(3)573-585 https://doi.org/10.1016/j.cvsm.2013.02.008

Niemiec B, Gawor J, Nemec A World Small Animal Veterinary Association Global Dental Guidelines. J Small Anim Pract. 2020; 61:(7)395-403 https://doi.org/10.1111/jsap.13113

Reiter AM. Chapter 12. Closed and open tooth extraction, 4th edn. In: Reiter AM, Gracis M (eds). Gloucester: BSAVA; 2019

How to set up for dental extractions

02 September 2021
13 mins read
Volume 12 · Issue 7
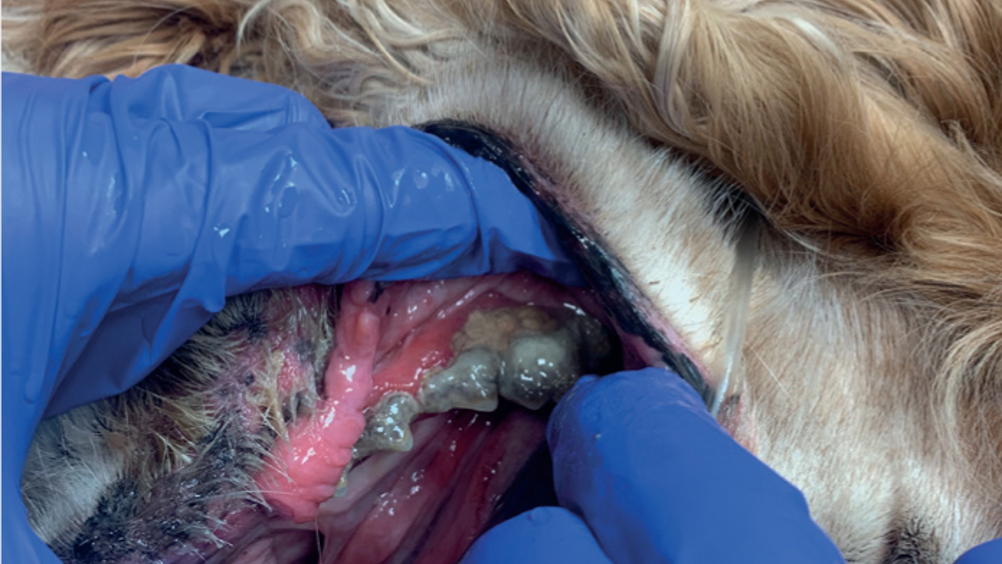
Figure 1. A dog with severe periodontal disease; all of these teeth required extraction.

Abstract

Exodontics is the branch of dental surgery concerned with the extraction of teeth. Dental extraction involves the removal of teeth from the dental alveolus (socket) in the alveolar bone of the incisive bones, maxilla and mandibles. There are two types of extractions the veterinary surgeon (VS) can perform — closed or open — and both are associated with tissue disruption and manipulation to varying degrees, which will inevitably initiate an inflammatory and pain response, which can prolong healing. The role of the veterinary nurse (VN) in preparing equipment and consumables for extraction should not be underestimated; excellent preparation can reduce surgical time, reduce the length of time the patient is anaesthetised, and ensure high-quality extractions can be performed by the VS to promote optimal postoperative healing.

There are many indications for the extraction of teeth in small animals. These include teeth affected by periodontal disease, fractured or worn teeth with pulp exposure, teeth involved in traumatic malocclusions, teeth with areas of resorption, persistent deciduous teeth and teeth affected by caries (Reiter, 2019; Niemiec et al, 2020) (Figures 15).

Figure 1. A dog with severe periodontal disease; all of these teeth required extraction.
Figure 2. A draining tract associated with 309, which had to be extracted. Image also shows the use of a cut-down syringe as a mouth gag and a cheek retractor to improve visualisation for the veterinary surgeon.
Figure 3. Pulp exposure of 202, which was extracted. Teeth 104 and 204 also require treatment because of fractures, which could involve either extraction or endodontic treatment, such as root canal therapy, if suitable.
Figure 4. Fracture of 304; this tooth was extracted.
Figure 5. A ‘lance’ 204 (mesioverted). This was extracted at the owner's request.

The veterinary surgeon (VS) will assess the oral cavity and dentition in the conscious animal first and discuss potential treatment options with owners. One of these options could be referral for advanced procedures, which can potentially save teeth as opposed to extracting them. The VS may recommend extraction as the best treatment option, or the owner may opt for extraction as opposed to referral. In these circumstances, the animal will be booked in for assessment under general anaesthetic plus extraction of the affected teeth.

What does tooth extraction involve?

Tooth extraction can be achieved using a closed or open (surgical) technique. As Reiter (2019) stated, ‘the principles of tooth extraction are to reduce or eliminate the retentive factors that hold a tooth in the jaw’. The American Veterinary Dental College (2021) explained that closed extraction is the extraction of teeth without flap creation, whereas open extractions involve the extraction of teeth after flap creation and alveolectomy. The VS will decide which technique to use following a full assessment of the teeth under anaesthetic and is likely to use a combination of both closed and open techniques according to the teeth that need to be extracted.

Pre-extraction radiographs are strongly advised because a large proportion of each tooth is not visible with the naked eye as it is seated within the alveolar bone, and there may be pathology present that would alter the VS' approach to extraction (Niemiec et al, 2020). Examples of radiographic findings that may alter the VS' extraction technique choice include roots that are resorbing, roots that are ankylosed to surrounding bone, and roots with abnormal morphology.

It is important for veterinary nurses (VNs) to possess a good level of knowledge regarding the process of tooth extraction so they are able to prepare for and assist with such procedures. Tooth extraction involves the VS performing the following individual procedures, informed by Gengler (2013), Reiter (2019) and Niemiec et al (2020):

  • Severing of the gingival attachment around the tooth, down to the level of the alveolar bone margin, with a scalpel blade
  • Sectioning the crown of multi-rooted teeth with a high-speed handpiece and bur as required
  • The use of sharp luxators worked into the periodontal ligament (PDL) space around the circumference of the tooth to sever PDL fibres which anchor it within the alveolus. Luxators are not designed for rotation force and can easily bend or break
  • The use of sharp elevators to place into the PDL space, which are slowly and gently rotated and held for around 20 seconds to tear remaining PDL fibres (at least 10 seconds as a minimum time). The VS can progress up through their elevator sizes as the PDL space widens
  • When the tooth is loose and the VS can move it freely within the alveolar socket, extraction forceps can be used to grip the tooth (if required) as far down the root as possible before applying very gentle and controlled rotation clockwise and anti-clockwise movements; the tooth should then be loose enough to remove from the alveolus in its entirety
  • The VS should then inspect the root to ensure it is whole (post-extraction radiographs should be taken as required)
  • The use of rongeurs to perform alveoloplasty, which is smoothing the alveolar ridge; any spiky bits of alveolar bone may compromise healing. A diamond bur can also be used for this purpose
  • Ensure a blood clot is filling the alveolus before suturing the gingiva over the extraction site if/as required.

Open (surgical) extractions additionally involve the following:

  • Use of a scalpel to create releasing incisions as/if required and the raising of a mucoperiosteal (MP) flap using a periosteal elevator, being mindful of the location of neurovascular bundles. The VS may also do this on palatal or lingual aspects of the tooth
  • The creation of a ‘window’ over part of the tooth's root by removing the overlying bone (alveolectomy) using a slow speed handpiece and bur, with sterile irrigant. Air and/or water should not be blown into an extraction site/the alveolar bone as it may cause an air embolism or emphysema. Air and non-sterile water are blown into the extraction site/alveolar bone if a highspeed drill is used on bone, so risks of the aforementioned complications are increased
  • The creation of a ‘gutter’ at the edge of the window in the PDL space for the placement of elevators.

In order to perform high-quality tooth extraction, the VS must have the correct equipment available, which has been properly maintained, and they must be able to use it correctly. Having just one main set of dental equipment that is used for all patients is not appropriate as one size will not fit all patients (Bellows et al, 2019).

Dental room

The dental room should be set up bearing in mind ergonomics, ventilation and the health and safety of all personnel (Bellows et al, 2019) (Figure 6). The ideal set-up to facilitate optimal procedures and extractions would include:

  • Using an adjustable height operating table with the VS sitting on a comfortable saddle stool at one end of the table. They can then adjust the height of both the table and the stool to ensure they are comfortable throughout the procedure and minimise the risks to their physical health
  • A dental X-ray generator, ideally wall-mounted to save floor space. Mobile generators on stands are available, as are hand-held generators (Figure 7)
  • The operating table needs to be lead lined or have a lead-lined mat placed in relation to radiographic health and safety, and the practice's Radiation Protection Advisor should be consulted to ascertain whether the designated room is suitable and safe for dental radiography
  • X-ray processing equipment set up with the patient's details inputted (Figure 8)
  • A good-quality surgical light with a focused beam (Figure 9). It would also be beneficial for the VS to have a pair of loupes for magnification and improved visualisation, to reduce eye strain during procedures.
  • A dental tray to collect water
  • Comfortable bedding for the patient, blankets to cover them up with and some form of external heat source
  • Anaesthetic machine, breathing systems and monitoring equipment set up and checked/tested before each patient
  • Infusion pump and intravenous fluids set up
  • Emergency drugs/‘crash’ trolley and equipment prepared
  • Air-driven dental machine and suction unit
  • Surgical trolley.
Figure 6. A bespoke dental suite with adjustable height operating table and saddle stool; dental machine and surgical trolley near to the operator; anaesthetic machine with breathing systems; multiparameter monitor and fluid pump; overhead surgical light; and wall-mounted dental X-ray generator. The table is set up with a surgical vacuum mattress, heat pads, a vet bed and blankets to keep the patient warm and comfortable during extraction.
Figure 7. Handheld X-ray generator.
Figure 8. Direct-to-digital computer set-up ready to receive and display oral radiographic images with sensor hanging over the corner of the trolley and a covering to protect it.
Figure 9. Ceiling-mounted surgical light for high illumination of the operative field when teeth are being extracted.

Equipment

Induction of anaesthesia

The use of an anaesthesia checklist is best practice and encouraged for all patients undergoing anaesthesia. Following admittance, the VN should place an intravenous (IV) catheter and a primed T-connector in each patient prior to administration of their pre-medication. Once placed and initially secured with a piece of tape, the IV catheter should be flushed with sterile saline to ensure it is patent before being further secured with tape and bandage material. A T-connector is recommended as they provide great flexibility for the operator, allowing a giving set to be attached without having to unwrap the tape and bandage that has been used to secure the catheter. Prior to the induction of anaesthesia, pre-oxygenation is recommended (via a face mask or flow-by, whichever is tolerated best by the patient) for 2–5 minutes to help prevent hypoxia (Bellows et al, 2019) (Figure 10).

Figure 10. Patient being pre-oxygenated prior to the induction of anaesthesia (intravenous catheter and T-connector can also be seen).

The VN should have prepared equipment required for the induction of general anaesthesia, and gathered this on a tray or in a kidney dish so it is all in one place and easily accessible for the VS (Figure 11). This should include:

  • Sterile saline flush
  • Induction agent (and other drugs the VS may request, such as co-induction medications like diazepam)
  • A functional laryngoscope
  • Local anaesthetic for the laryngeal mucosa in cats (e.g. Intubeaze)
  • Selection of endotracheal (ET) tubes:
  • Ones with high-volume, low-pressure cuffs (not red rubber ET tubes which have low-volume, high-pressure cuffs)
  • ET tubes should be cut to size. The correct tube length can be determined by lying it against the side of the patient's head and neck. The proximal end should be level with the incisors and the distal tip should lie between the larynx and the carina, ideally within the proximal third of the trachea. Reducing the amount of excess tubing protruding from the mouth helps to reduce dead space, which encourages rebreathing (Dugdale et al, 2020)
  • Cuff insufflator
  • ET tube tie that is not a piece of white open-weave bandage material as this easily gets caught up in the dental drills and damages them. They can be easily made from giving set tubing, which provides excellent grip on the ET tube throughout the procedure and makes them very easy to clean and sterilise between patients (can be observed in Figures 1, 2, 4, 5 and 17)
  • Eye lubrication, applied at the start of the procedure and then at least every hour while under anaesthesia depending on the patient and product used, as tear production will be reduced
  • An anaesthetic monitoring chart must be prepared in advance of the procedure, along with the dental chart.
Figure 11. Equipment required to extract a tooth. Clockwise from top left: the tray contains all induction equipment, drugs, endotracheal (ET) tubes and lubricant, ET tube ties, cuff insufflator, laryngoscope and some suture material for the end of the procedure. Next is the examination kit and non-sterile gloves, followed by a pair of sterile surgical gloves and some sterile swabs. Then there is a luxator/elevator kit, a surgical kit, a pair of rongeurs, a pair of extraction forceps, and a small towel, blue roll and X-ray CR plates in their protective pouches. This equipment is moved and a sterile drape placed on the trolley following oral assessment prior to commencment of extraction.

Oral assessment

Personal protective equipment (PPE), such as gloves and masks, should be donned at the start of the procedure, including goggles or a face visor (Bellows et al, 2019, Niemiec et al, 2020). An examination kit should be selected which contains a dental mirror (so all surfaces of the teeth can easily be examined without having to manipulate the patient's head), a graduated dental probe, and a sharp dental explorer (Figure 12). In relation to operator safety, it is preferable to avoid using a double-ended probe and explorer; if the operator is concentrating on what they are probing and leans in for a closer look, there is the risk of being stabbed in the face with the explorer. It is useful to use a gag to keep the oral cavity open during assessment and throughout the procedure, which can be a 2.5 ml syringe or needle cap cut down for the size of the patient, avoiding spring-loaded mouth gags. As suggested by Niemiec et al (2020), these should be regularly removed and replaced throughout the procedure to prevent reported complications associated with their use, such as temporary or permanent postoperative blindness in cats (Figure 13).

Figure 12. Contents of an examination kit. One sterile kit is used for each patient. Left to right: dental mirror, graduated probe, sharp explorer.
Figure 13. A very simple oral gag made out of a 2.5 ml syringe, which can be cut down further as required to suit the size of the patient.

The VN should be documenting all of the pathology the VS verbalises as they assess the oral cavity accurately on a species-specific dental chart. This allows severity of the pathology to be established, and the VS can use the information to make informed decisions about what they would like to X-ray, the treatment plan and which teeth need to be extracted. As extractions are completed, the VN must remember to cross out those teeth on the chart.

Once the VS has completed the assessment and imaging and made a diagnosis regarding which teeth to extract, local anaesthetic drugs should be used as part of a multimodal analgesic plan for the patient (Bellows et al, 2019); these drugs should have been prepared by the VN prior to the procedure (Figure 14). Teeth and the surrounding oral cavity structures are extremely well innervated and tissue manipulation during extraction cannot be avoided whether the VS is performing closed or open (surgical) extractions. Local anaesthetic drugs block transduction of nociceptor impulses from the oral cavity and should be used in all patients undergoing extractions. While the local anaesthetic drugs are taking effect, the teeth and oral cavity can be doused in a chlorhexidine oral solution and scaling performed to ensure the operative field is clean.

Figure 14. Ampoule of local anaesthetic loaded into a dental cartridge syringe. A fine needle is screwed into place to puncture the ampoule. The cartridge syringe is sterilised between patients.

Surgical instruments and consumables

It is the VN's responsibility to ensure all instruments and consumables selected for use are sterile (Niemiec et al, 2020). The VS should don sterile gloves via the open method before the VN opens a sterile trolley drape in an aseptic manner with which to cover the trolley.

For tooth extraction, the VN should select the following equipment (Figures 11 and 15) and open them in a sterile manner for the VS to place on their draped trolley:

  • A surgical kit
  • A size 15 blade (or whatever blade the VS prefers)
  • A luxator/elevator kit
  • A pair of extraction forceps
  • A pair of atraumatic thumb forceps (e.g. Adson Brownes)
  • A pair of rongeurs
  • A packet of sterile surgical swabs
  • Suture material
  • Additional retraction aids as required
  • Sterile high-speed handpiece
  • Sterile low-speed motor and handpiece
  • Selection of burs for both the low- and high-speed handpieces.
Figure 15. Instrument trolley mid-extraction procedure. Instrument tins are advised to protect all of the instruments during sterilisation and storage as it is vital that equipment is protected and the instruments remain sharp to ensure optimal tooth extraction.

A surgical kit containing instruments appropriately sized for the patient should be selected. For example, it is useful to have both canine and feline surgical kits (Figures 16a;16b). It is advised that these kits are stored and sterilised in trays to protect the instruments and the sharp working edges (Niemiec et al, 2020). A luxator/elevator kit should be selected, again containing instruments appropriate to the size of the patient.

Figure 16a. Canine surgical kit, which is essential when performing extractions. Left to right: a probe and explorer (prefer a separate examination kit), a periosteal elevator, a Senn retractor, a scalpel handle, Adson Browne forceps, needle holders, mini Metzenbaum scissors.
Figure 16b. Feline surgical kit (also suitable for small dogs). Left to right: a probe and explorer, scalpel handle, Adson Browne forceps, very small needle holders (Castroviejo), a smaller retractor than in the canine kit, a smaller periosteal elevator, mini Metzenbaum scissors.

An appropriately sized pair of rongeurs and extraction forceps should be selected for the patient, along with suture material. Preferred suture materials include 4/0 or 5/0 synthetic absorbable monofilament or multifilament materials that rapidly absorb, swaged onto a reverse cutting needle (Niemiec et al, 2020).

In addition to the retraction aids contained within the surgical kits, it is advisable to have a range of cheek retractors available to aid visualisation of the caudal oral cavity during the procedure (Figures 2 and 17). Visualisation will also be improved throughout the procedure by having suction available, which the VN should operate as required ensuring the suction tip remains sterile (Figure 18).

Figure 17. Small retractors from the surgical kit being used to retract tissues to improve visualisation. Suction of the blood visible intraoperatively by the veterinary nurse is also advisable so the veterinary surgeon (VS) does not need to keep stopping what they are doing to swab the area. (In the absence of a normal surgical drape, this image shows that sterile surgical swabs can be used to create a barrier between the VS' hands and the patient's fur).
Figure 18. Suction unit. Suction is invaluable during extraction procedures to improve visualisation. Suction can also be a feature of dental machines.

Ideally, a low-speed surgical unit with sterile saline irrigant should be used for bone removal (Figure 19); if this is not available, a low-speed handpiece on the dental machine can be used that allows sterile saline to run through the handpiece as the irrigant for cooling the bur. If such a handpiece is not available, separate attachments for straight and contra-angle handpieces can be purchased and hooked up to a sterile bag of fluids via a normal giving set. Alternatively, the VN can dribble sterile water onto the bur as the VS is using it. Ultimately, a low-speed handpiece should be used to bur away bone with sterile saline as the irrigant; as previously mentioned, high-speed handpieces blow contaminated water from the dental machine into bone, which is not safe practice and no water will be sterile by the time is has passed through the tubing of your dental machines.

Figure 19. Low-speed surgical unit set up and ready for use to remove bone during open (surgical) extractions. The speed/torque can be programmed, the handpiece and cabling are sterile and a bag of sterile saline is set up with the tubing being fed through the peristaltic pump at the back of the unit before being connected to the handpiece. It is operated with the foot pedal.

Post pocedure

Following the extraction procedure, the equipment should be cleaned and sterilised before being used again. Instruments with sharp tips should be cleaned and then sharpened prior to being packaged for sterilisation. Low- and high-speed handpieces and motors should have the outer surfaces wiped with disinfectant wipes, oiled (Figure 20), and then be packaged for sterilisation. Burs that are still sharp can be cleaned with a wire bur brush and placed in a bur block and packaged for sterilisation (Figures 21 and 22), and all sterile consumables such as swabs should be replenished accordingly.

Figure 20. Oil sprays for handpieces. They come with two different tips to fit the different low- and high-speed handpieces being oiled.
Figure 21. Sterilised bur block containing a range of friction grip (FG) burs that are used for a variety of tasks during tooth extraction (high-speed handpiece).
Figure 22. Sterilised bur block containing a range of longer surgical burs that are used with the low-speed handpiece for removing bone during tooth extraction.

Conclusions

The role of the VN in preparation for tooth extraction is crucial to optimal performance of surgical procedures and is more involved than one might imagine. Poorly maintained equipment can cause unnecessary tissue damage and increase the length of the procedure. Similarly, not having all equipment available from the start will only serve to increase the length of the anaesthetic and the frustrations of the VS. A VN should endeavour to improve their knowledge regarding the process of extraction in order to understand why and how a specific piece of equipment is being used in order to better anticipate the needs of the VS.

KEY POINTS

  • A correctly set-up dental suite will improve the health, safety and welfare of both the patient and personnel.
  • Well-maintained equipment will enhance the quality and efficiency of tooth extraction.
  • Dental radiography is an essential tool for all dental, oral and maxillofacial procedures, but is especially useful pre-extraction to check the tooth root for any abnormalities that may hinder the surgical procedure.